Shapes are everywhere: 5 ways to explore shape outdoors

Look in any direction and your eyes will fix upon a shape- a rectangular screen, a circular table, a square vase- our world is made up of 2d and 3d shapes. Children start to explore shape from a very early age; playing with small puzzle toys and building with blocks, they begin to develop spatial visualisation. From there, they can start to learn the names and properties of shapes. So let’s take a look at five ways we can utilise the outdoor learning environment to enhance inquiries into shape.

Looking for shapes

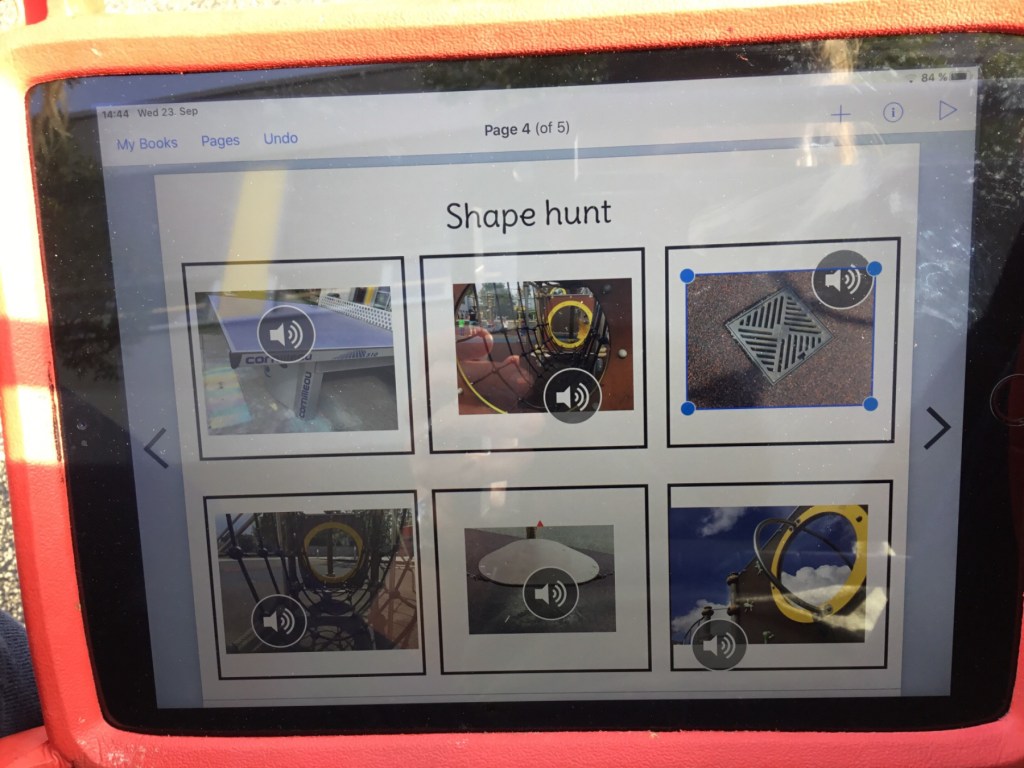
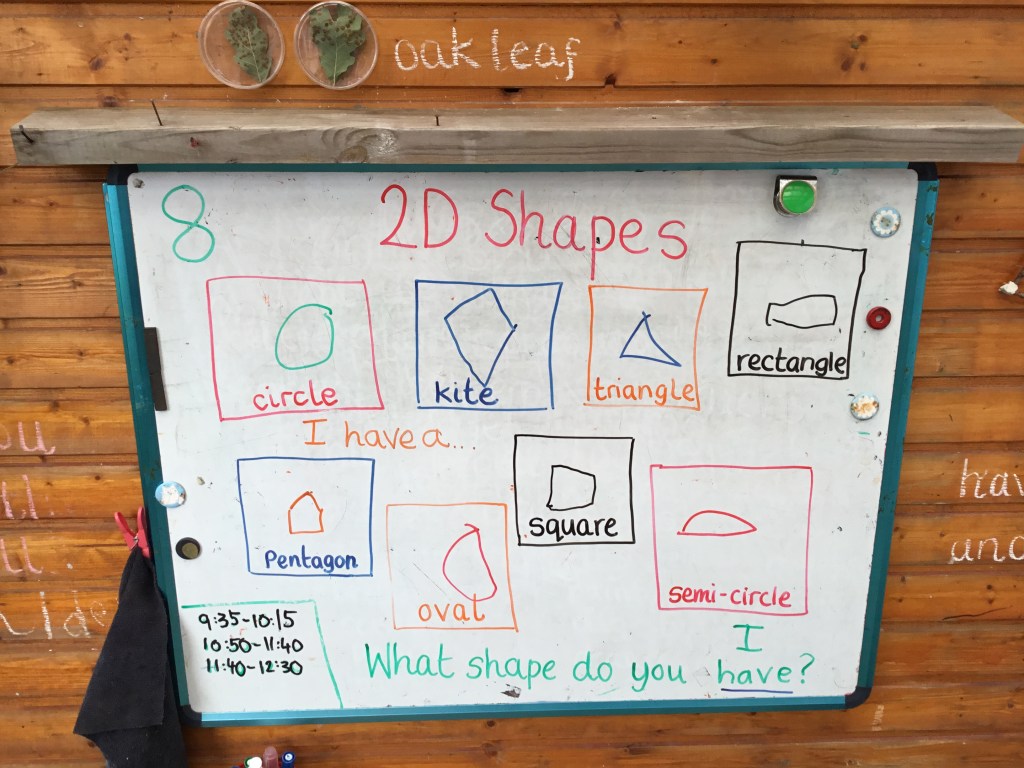
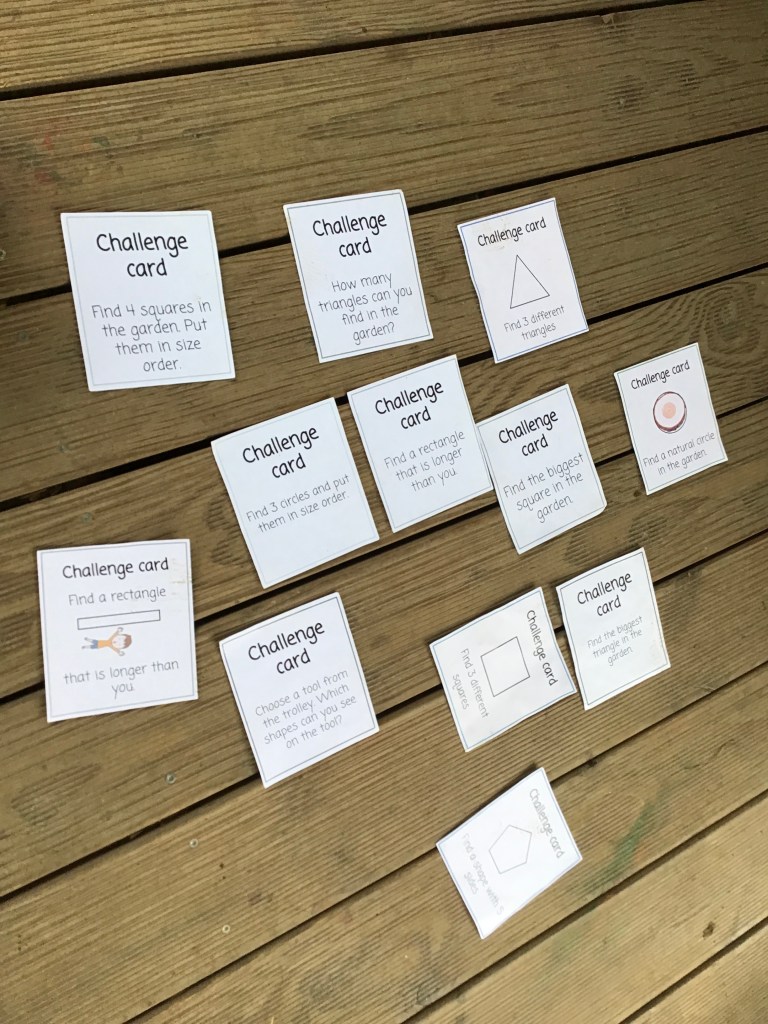
A great and simple way to get children to start thinking about shape is to go on a shape hunt. In your outdoor learning space, or on the playground, challenge children to find shapes. You can either focus on one shape, encouraging children to compare size and orientation, or supply them with a list of different shapes to search for. You can differentiate the challenge by giving children a list of shape names or showing them an image. 

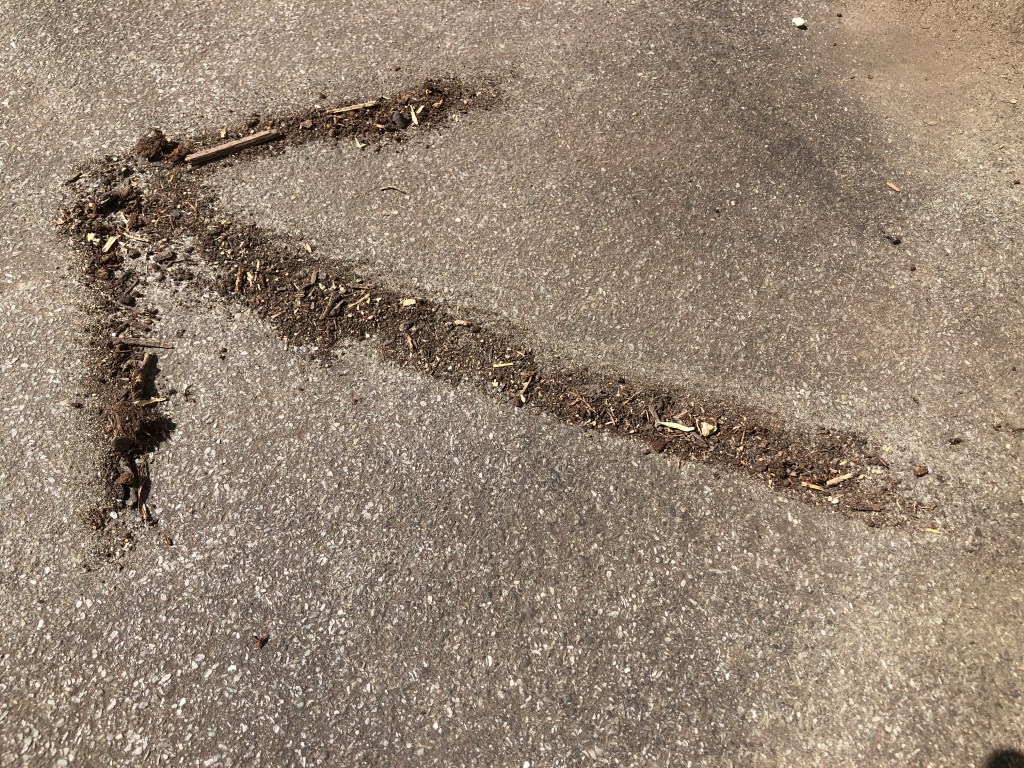
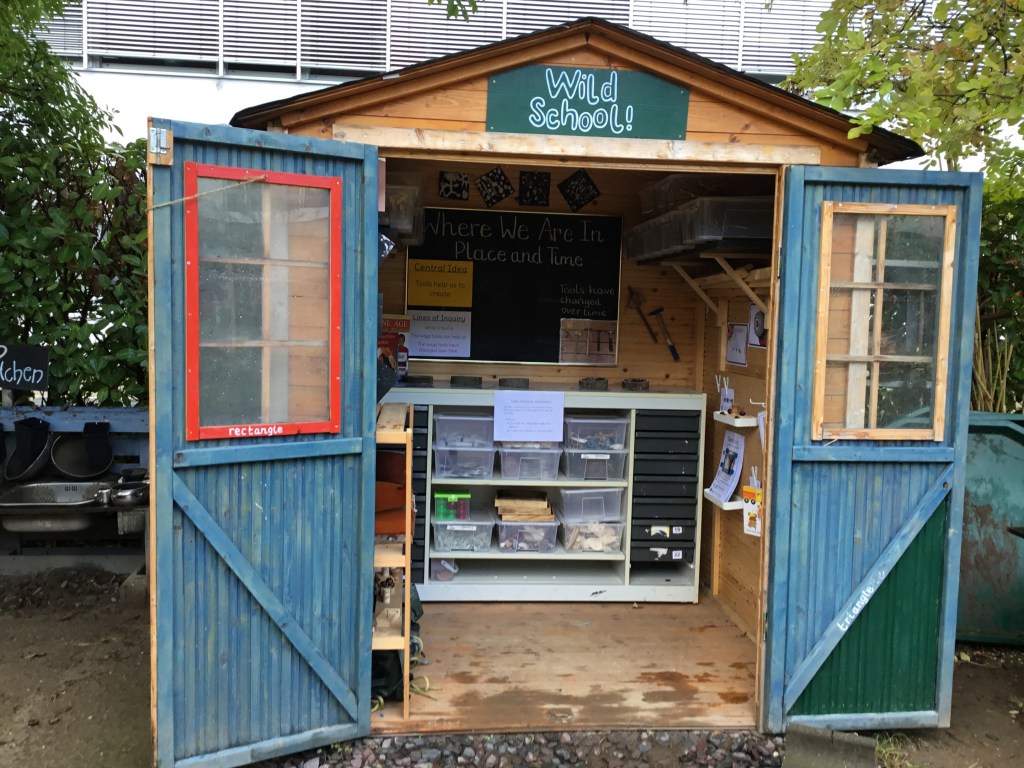
You can also encourage children to observe shapes everyday by highlighting existing shapes on your in and around your space, as you can see in the photo of our shed below.
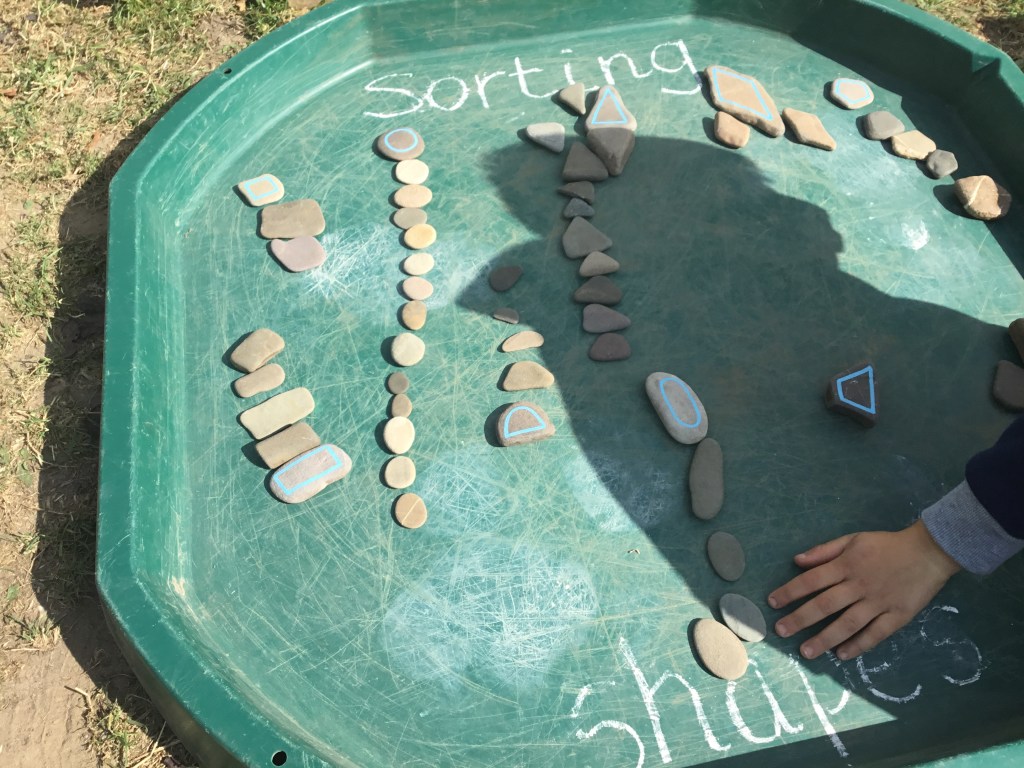
Sorting shapes

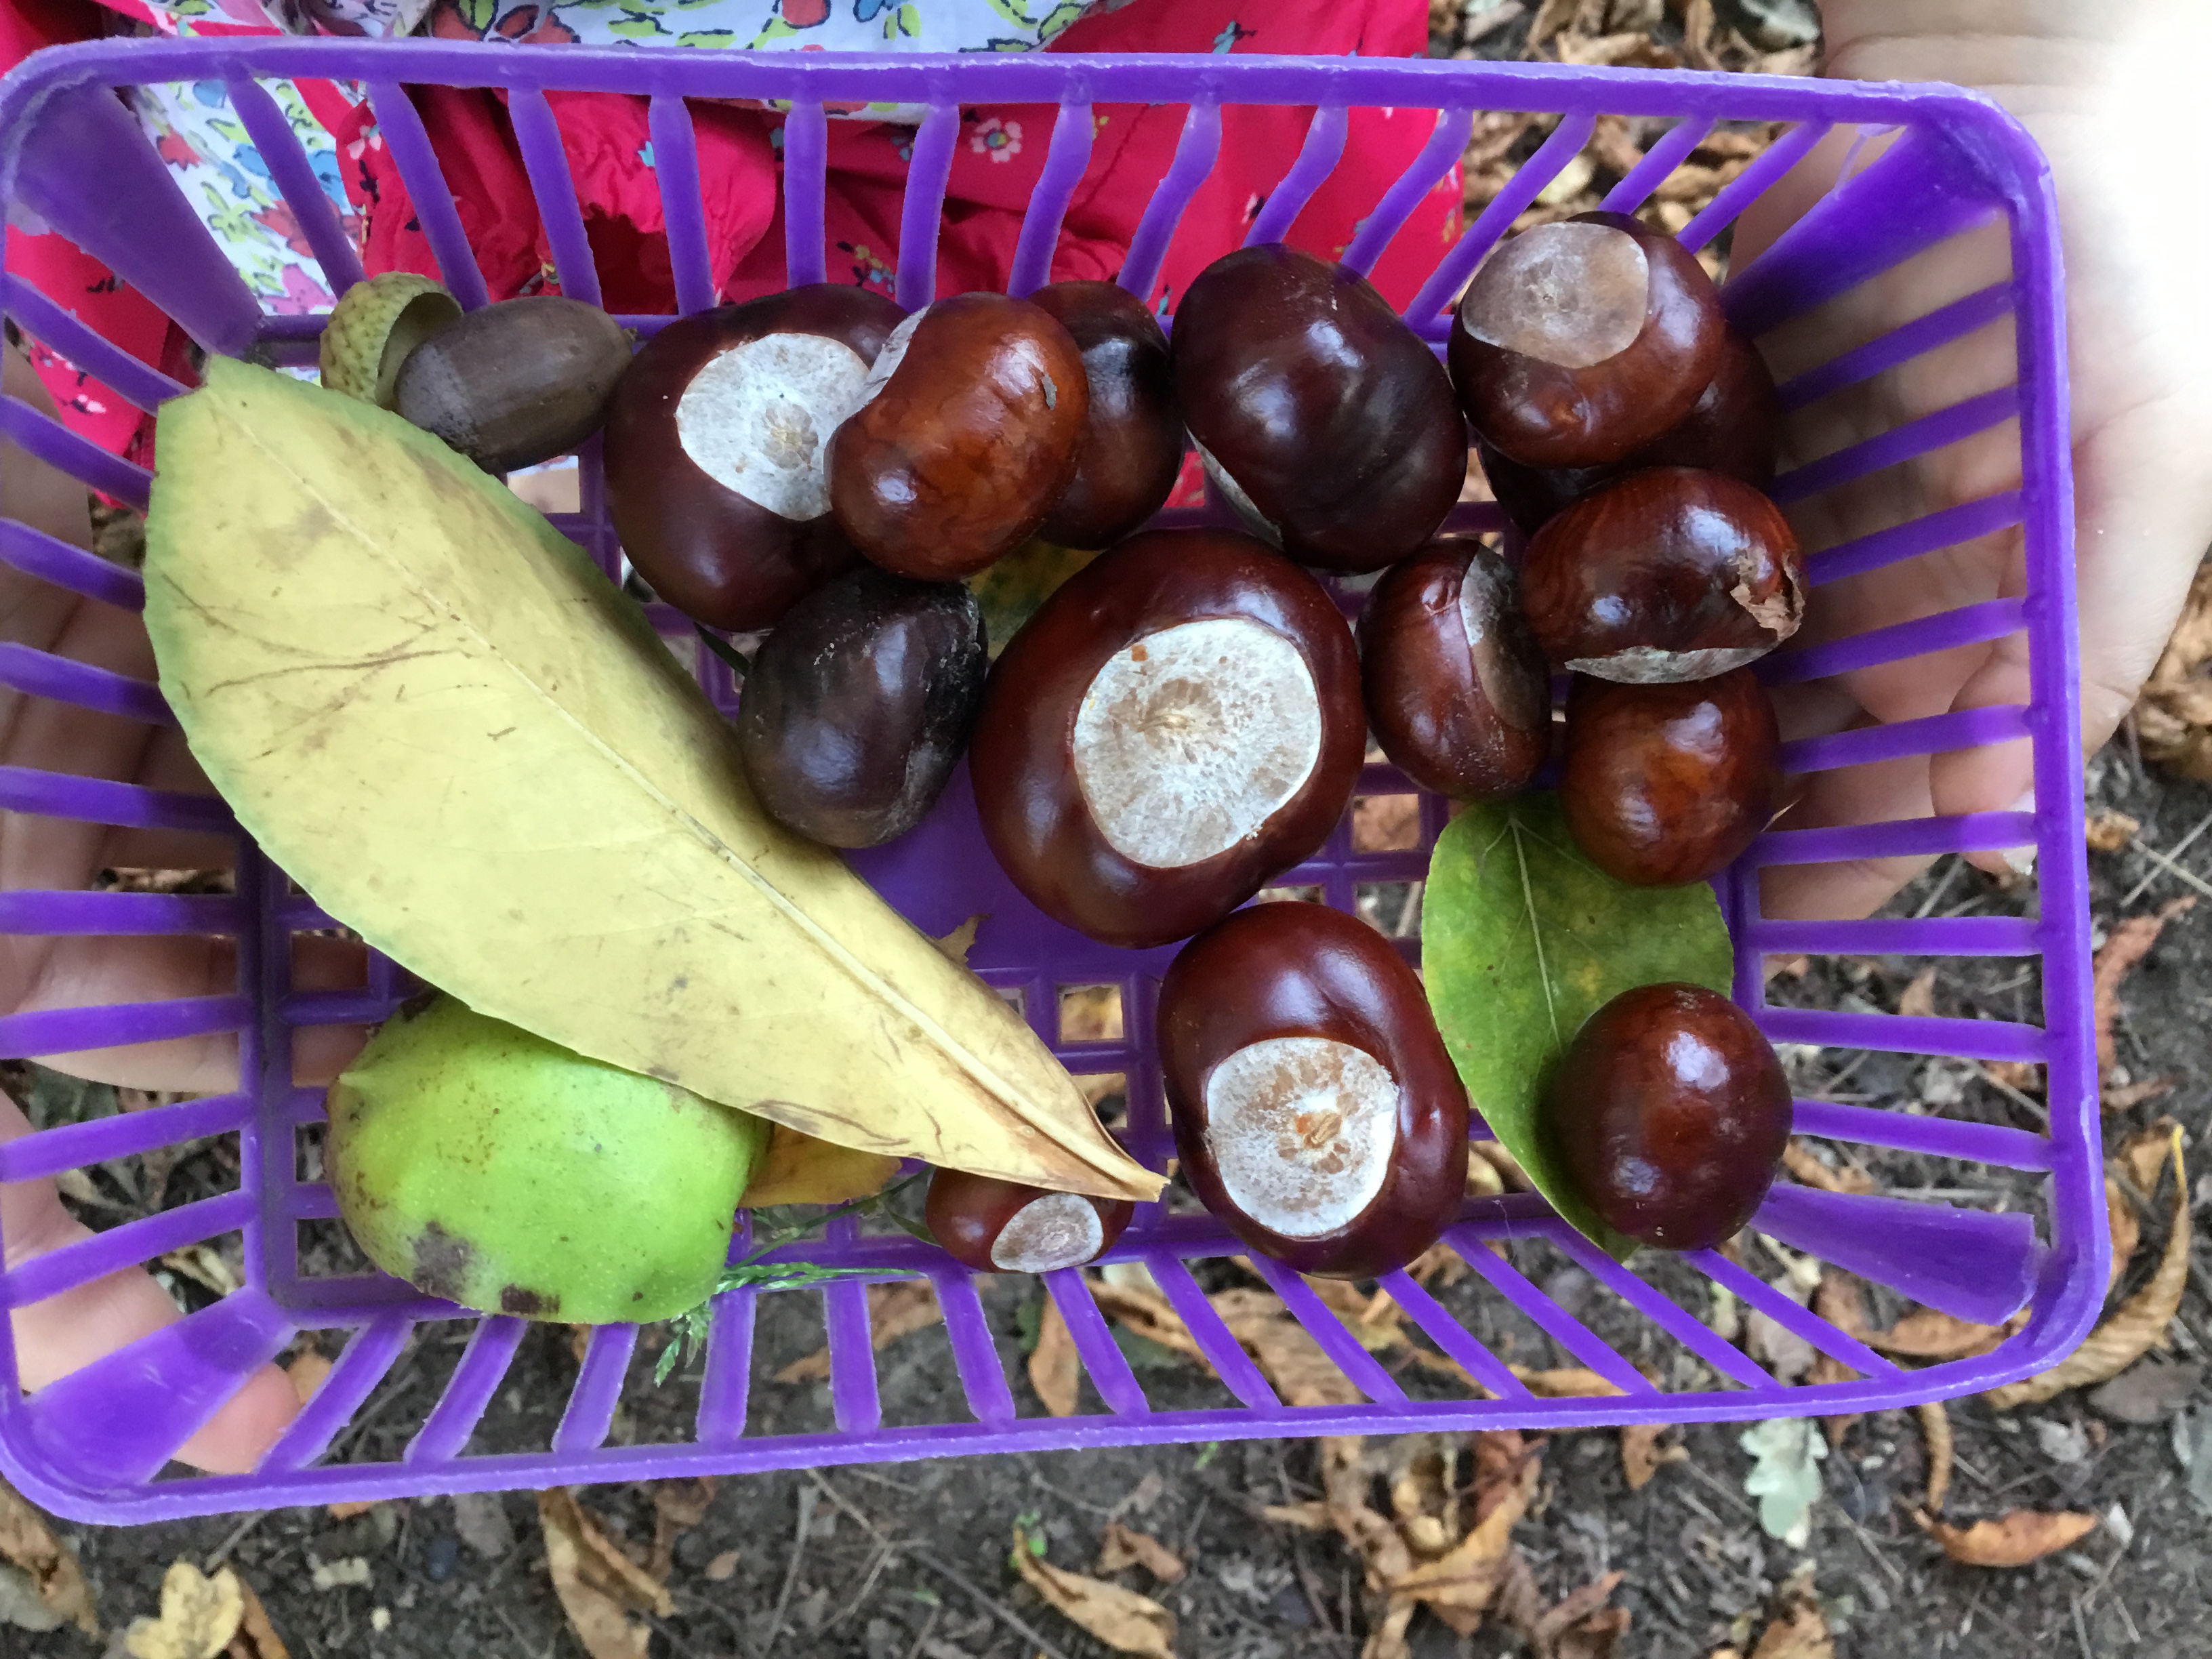
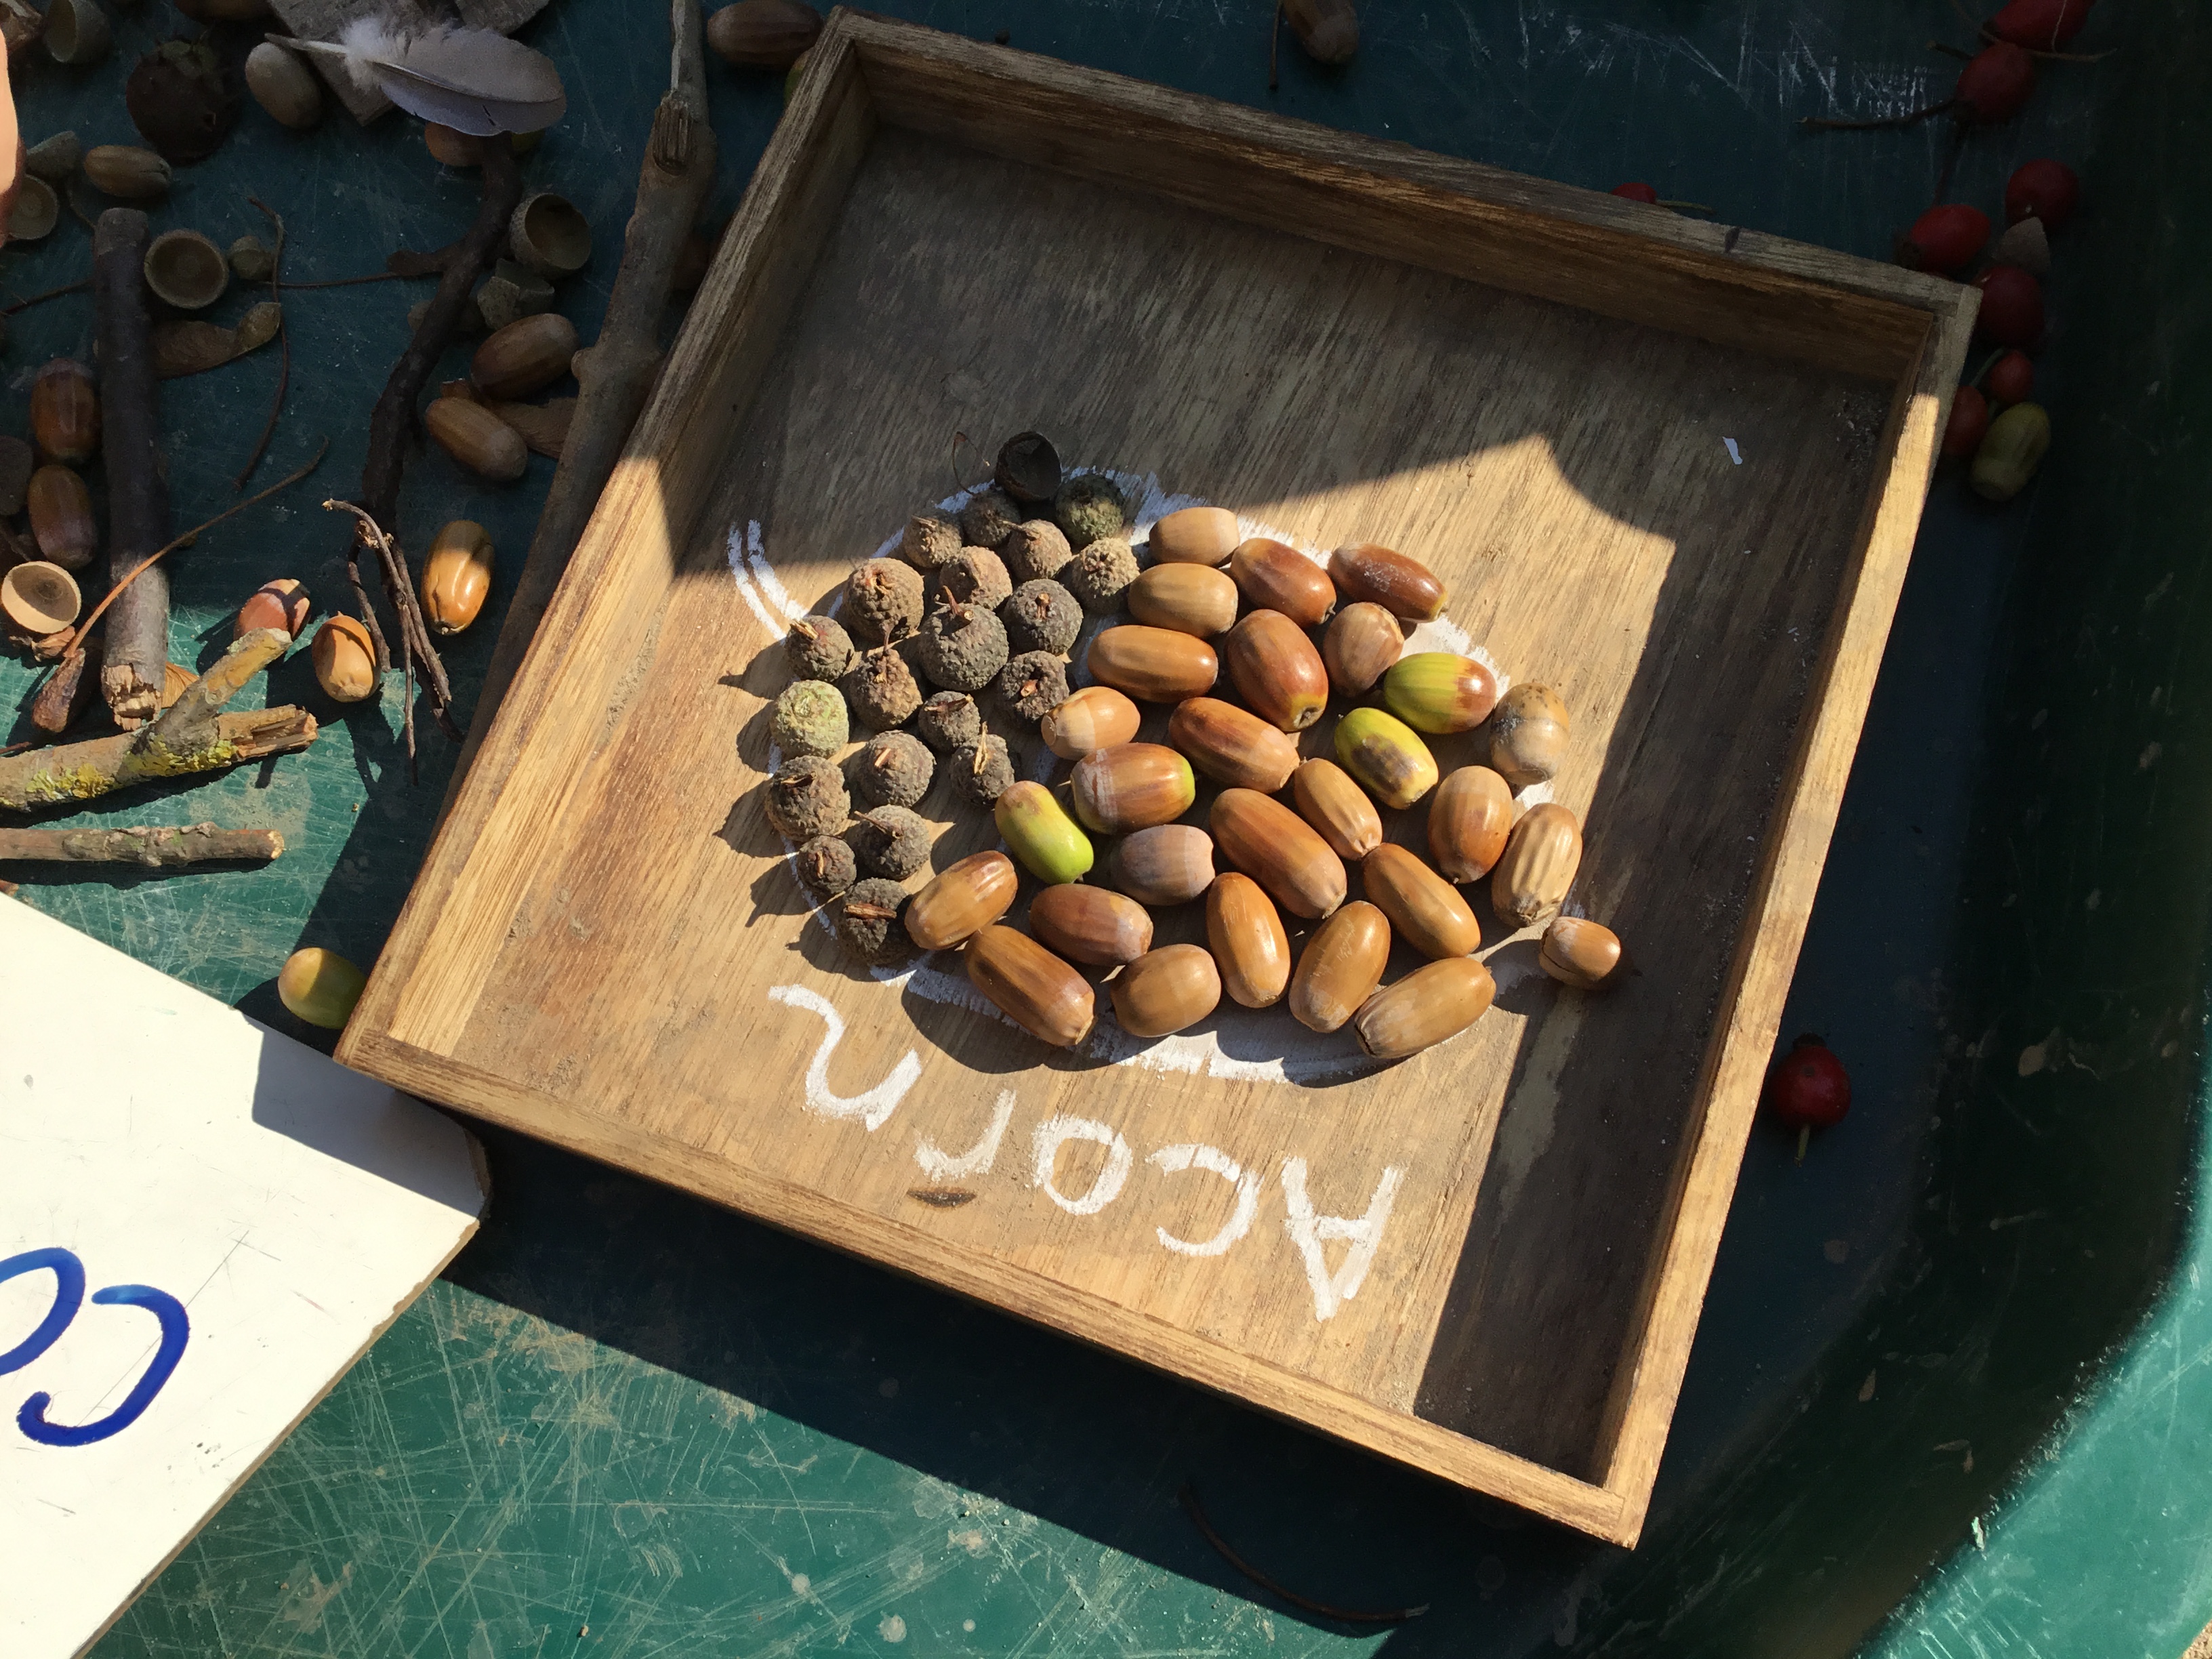
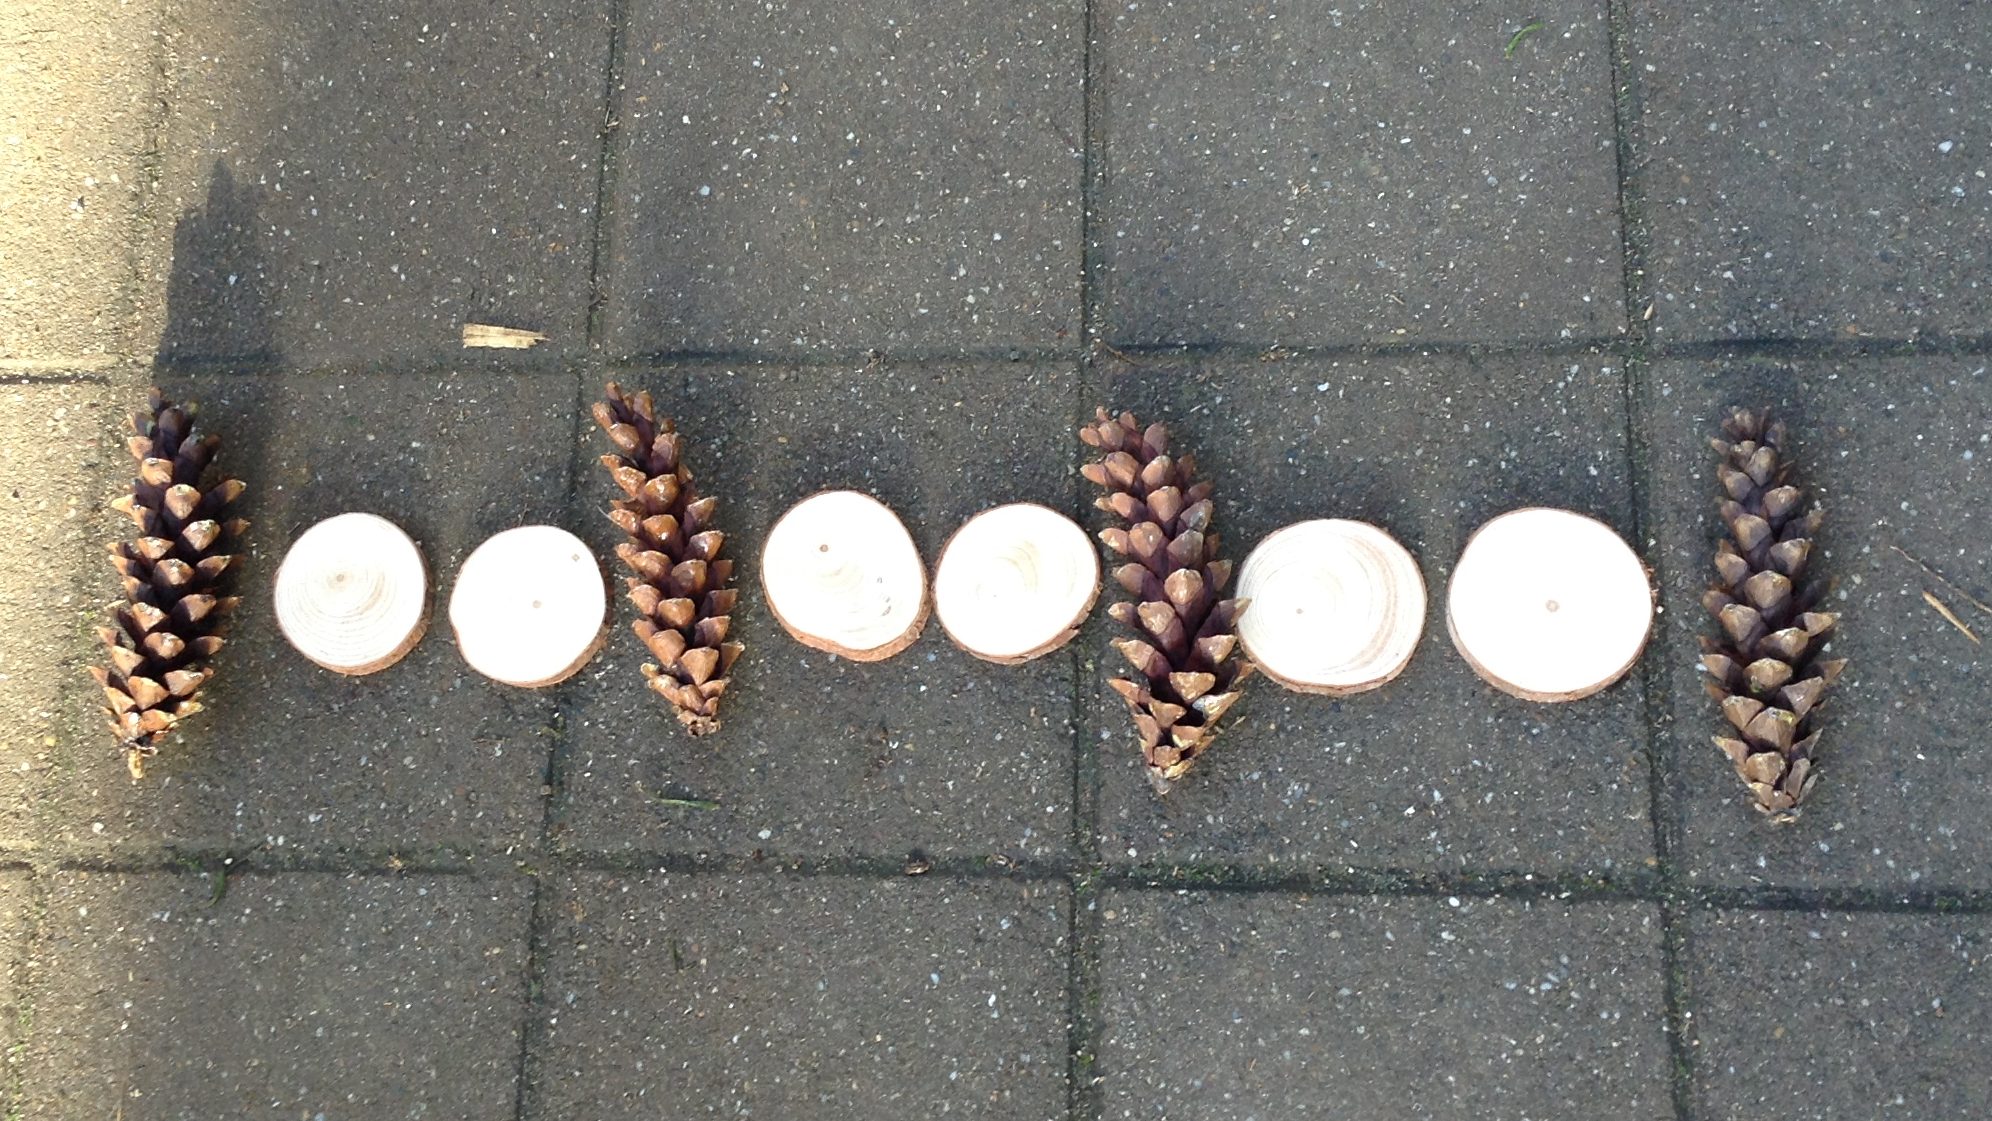
Whether you have a basket of Autumn treasures or a bucket of stones, invite the children to look for shapes. Find different ways to categorise the objects. Conkers can be circles, acorns are natural ovals, and ooh, how many sides does this stone have? Guess my rule is a fun game to complement this activity. After sorting a handful of objects, a child shows their groupings and says “guess my rule” then everyone else tries to work out the parameters they used to sort their shapes. 
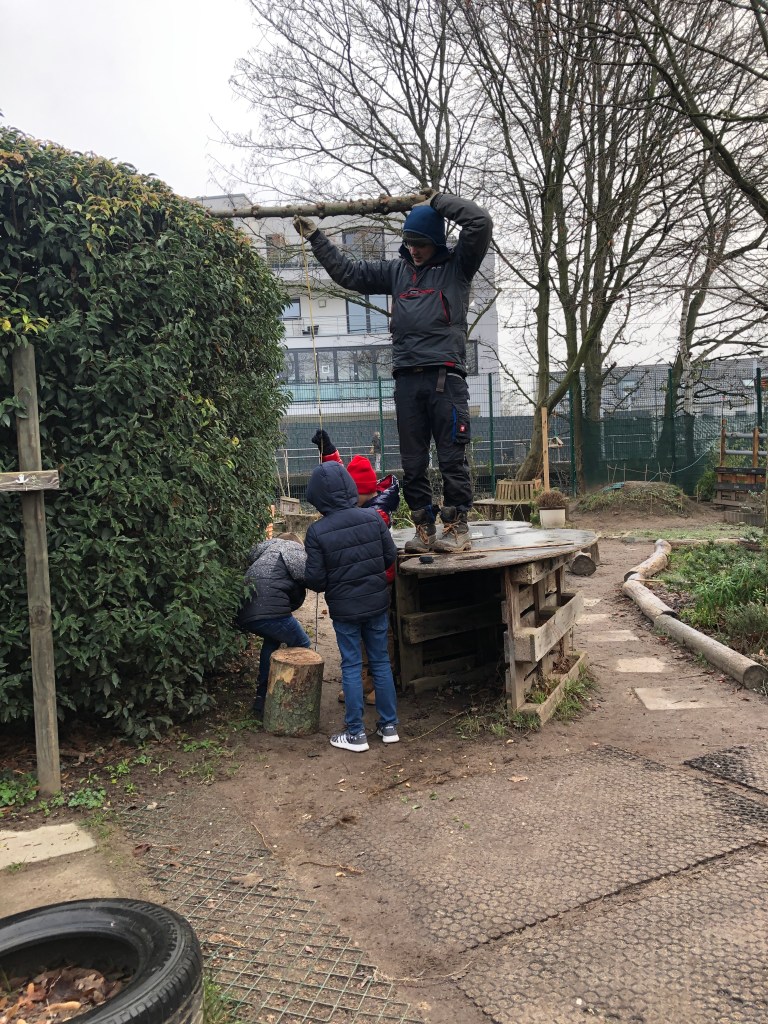
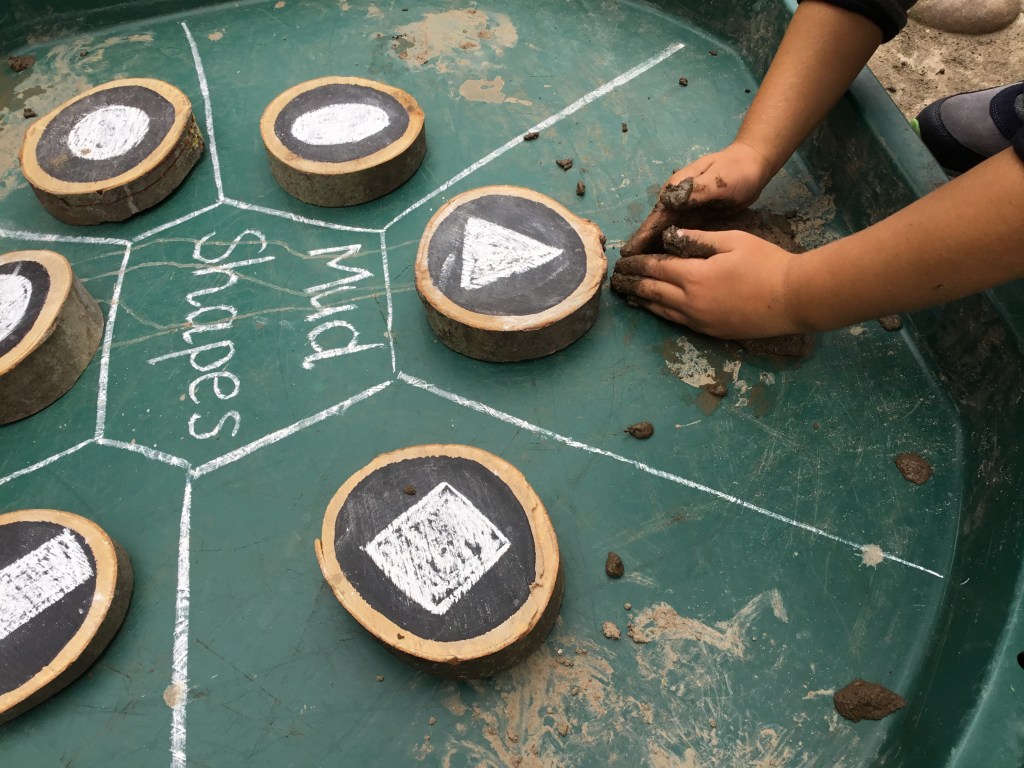
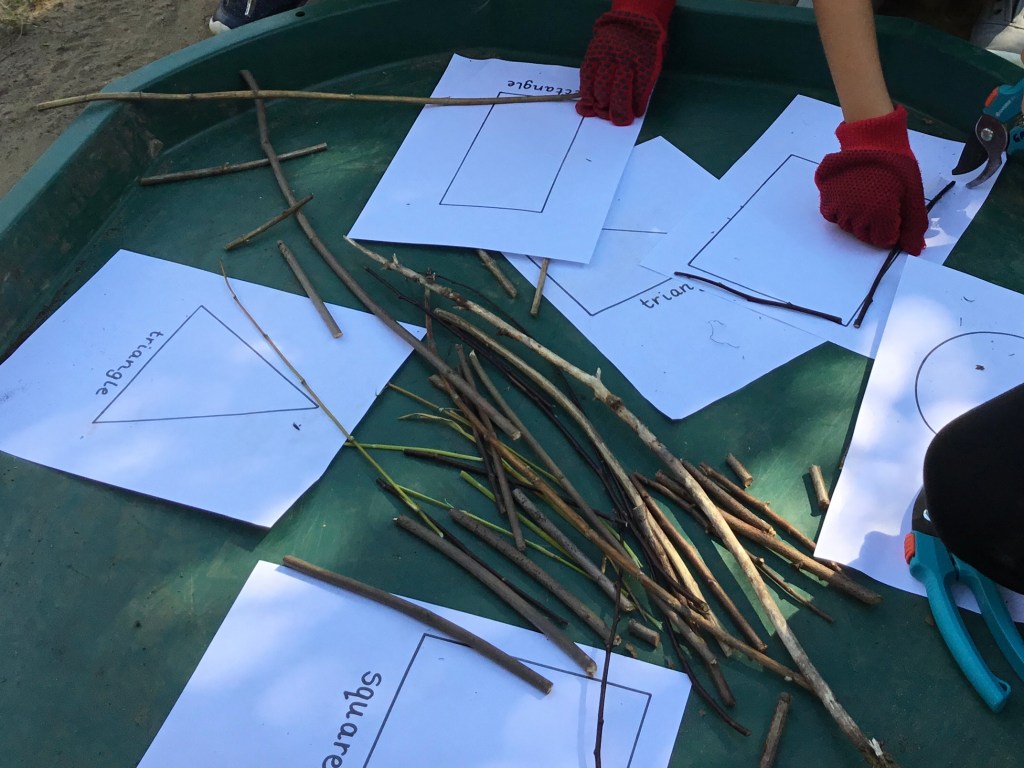
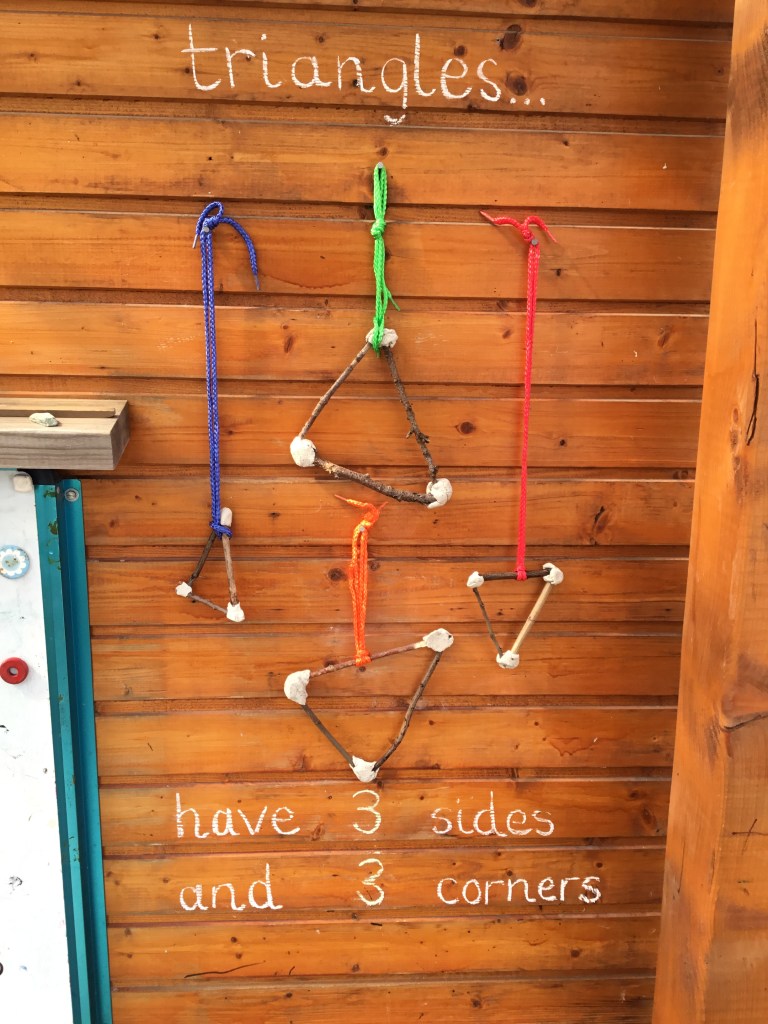
Making shapes

There are so many fun ways to make shapes using natural materials. Here are some quick examples:

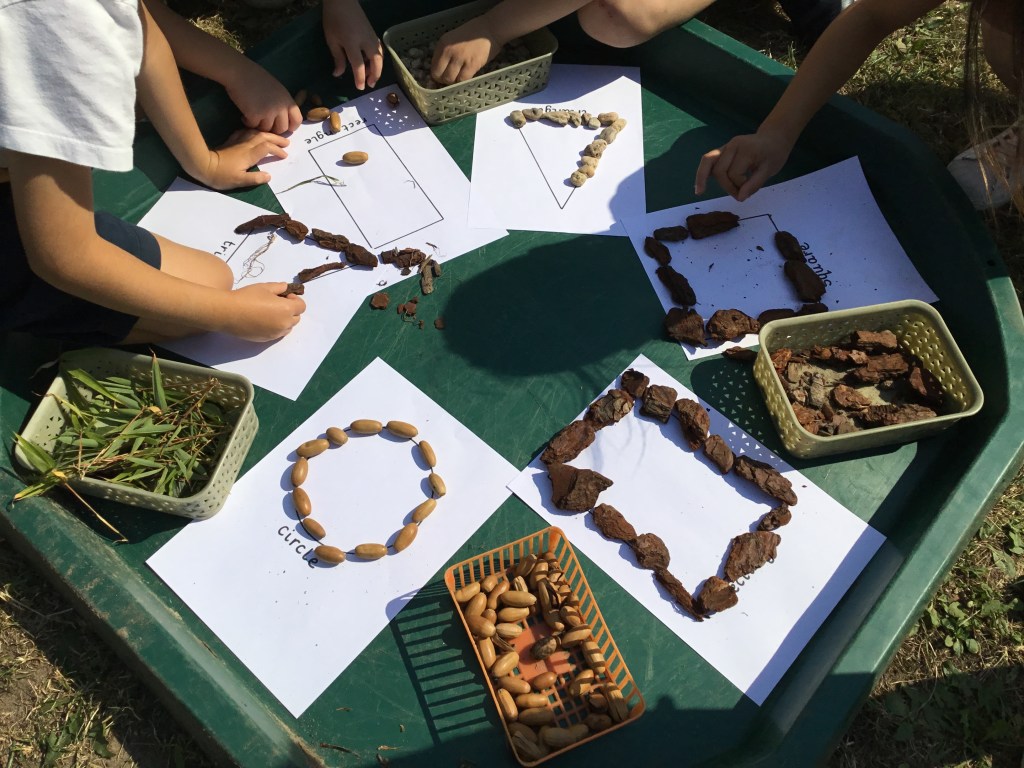
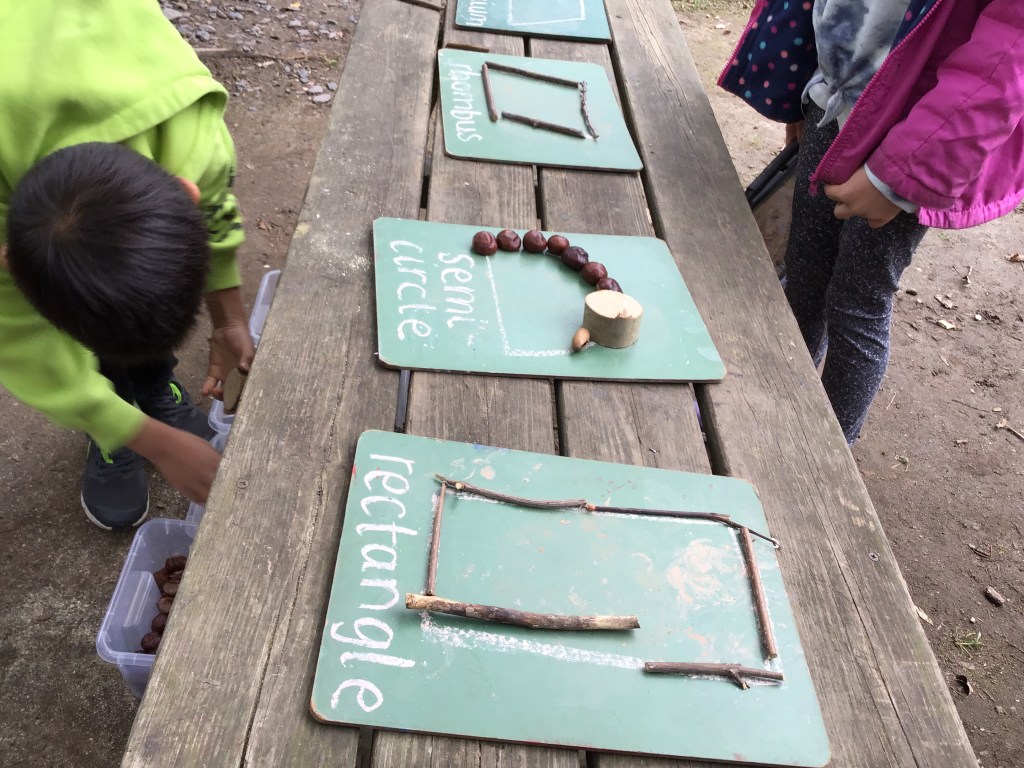
  • Grab some pots of seasonal treasures (leaves, acorns, pinecones etc) and challenge the children to make regular and irregular shapes. Using sticks and conkers, they can also identify the sides and corners. You can let the children create their own shapes or give them a template to work on top of. 
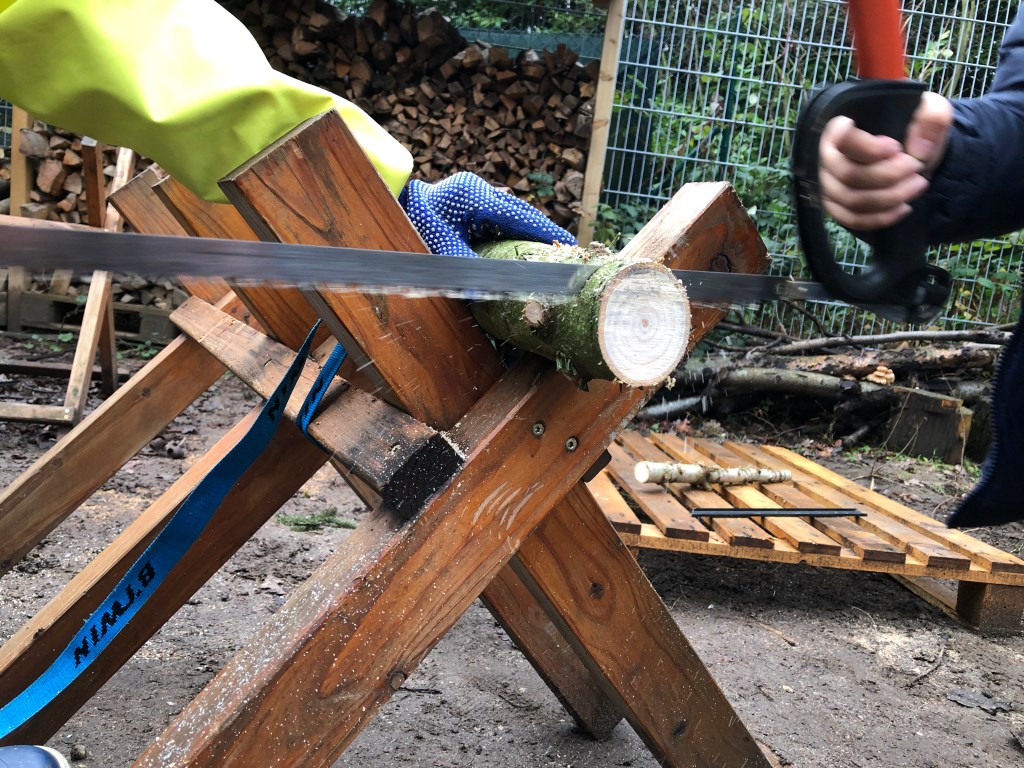
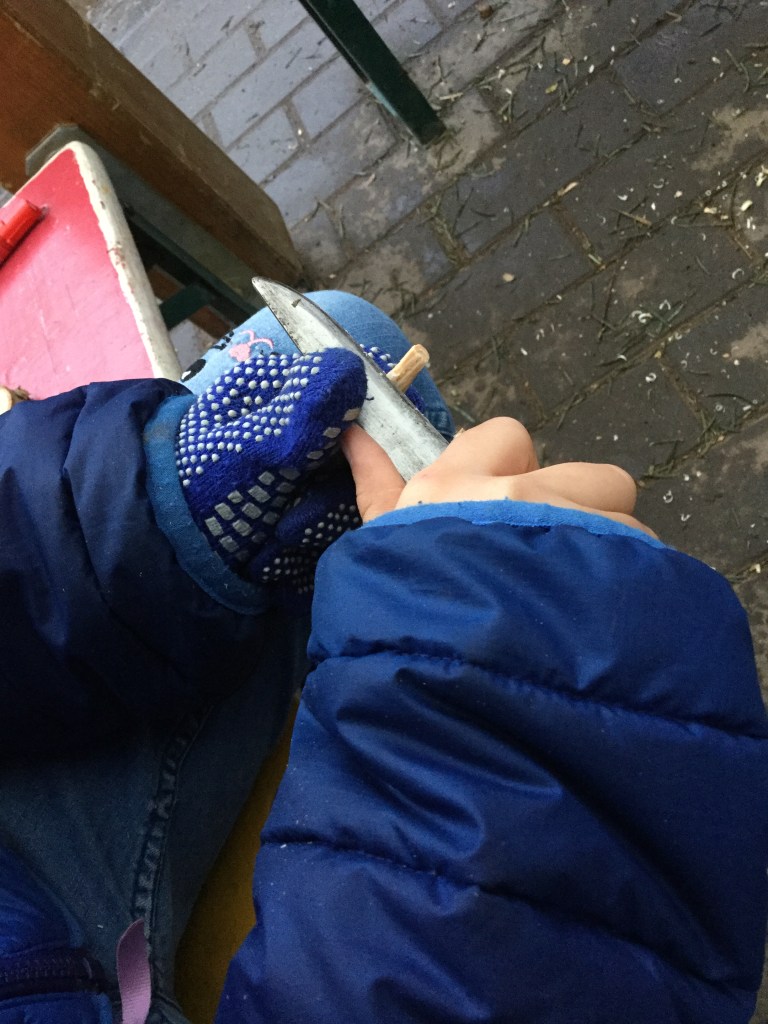
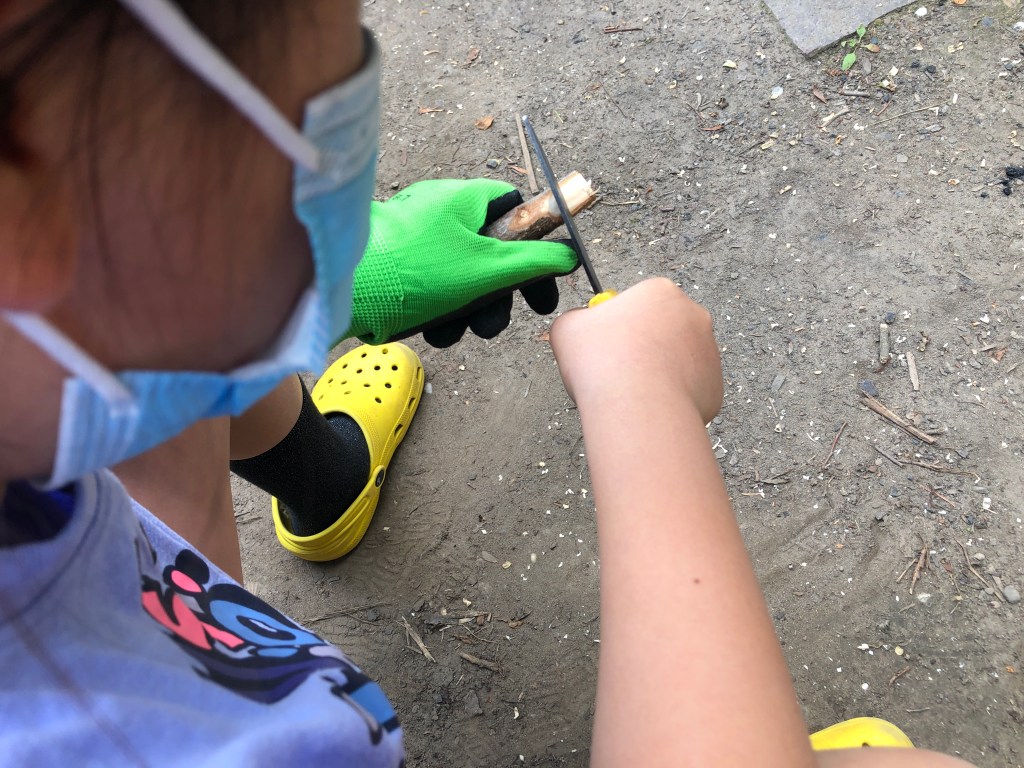
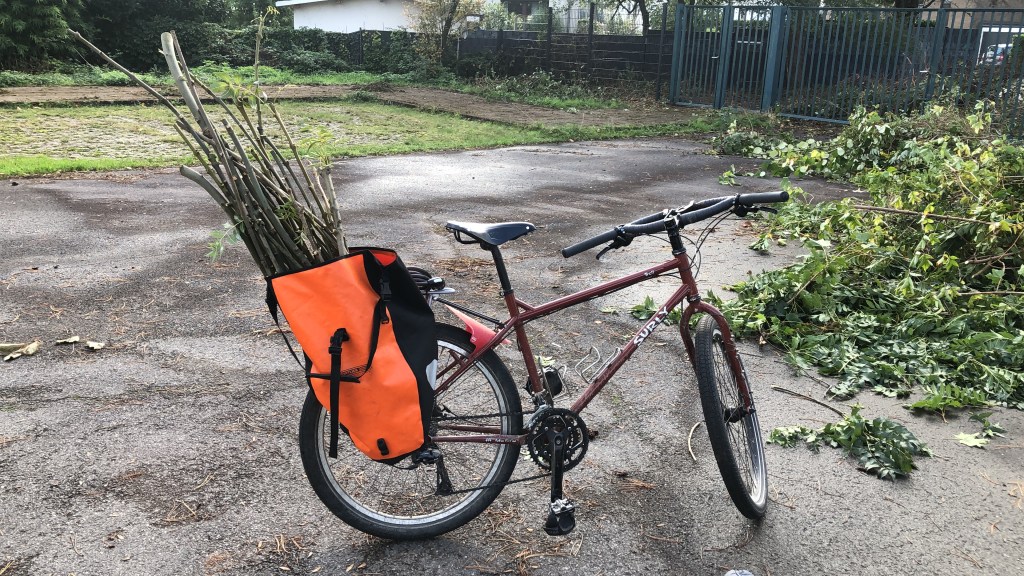
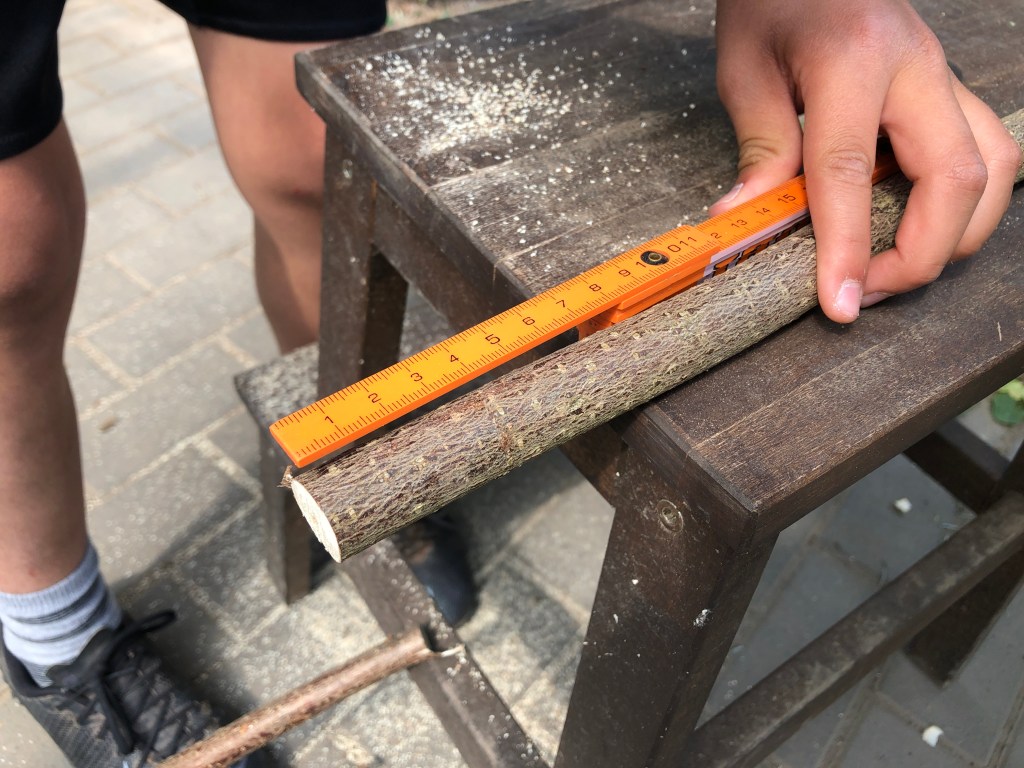
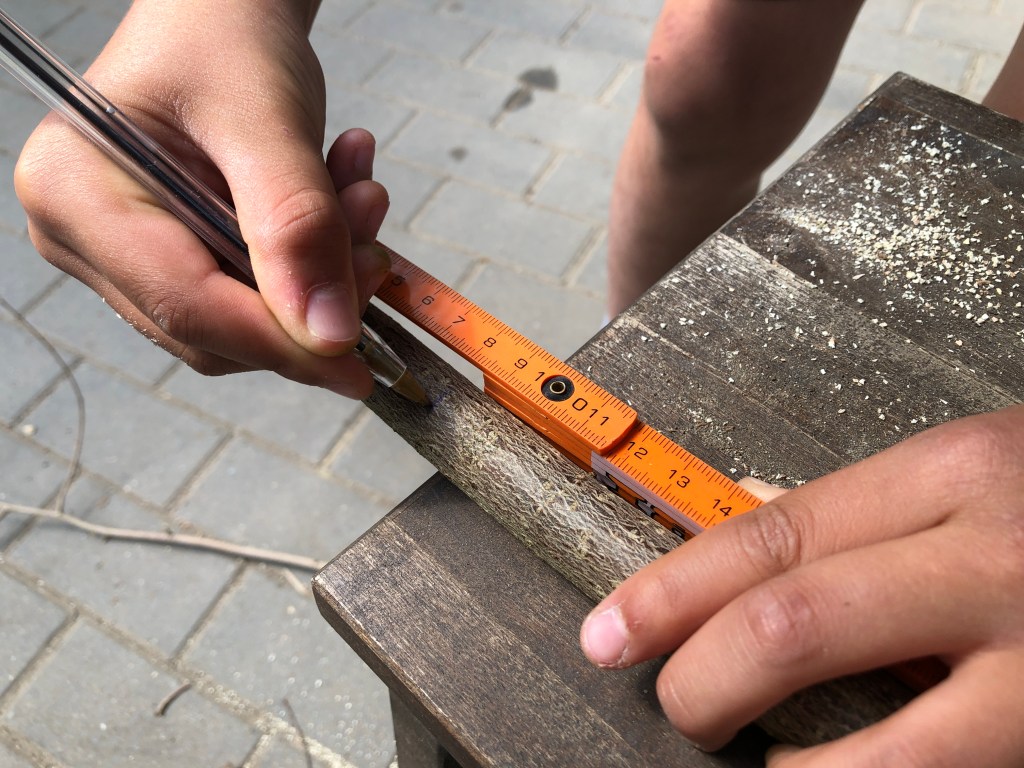
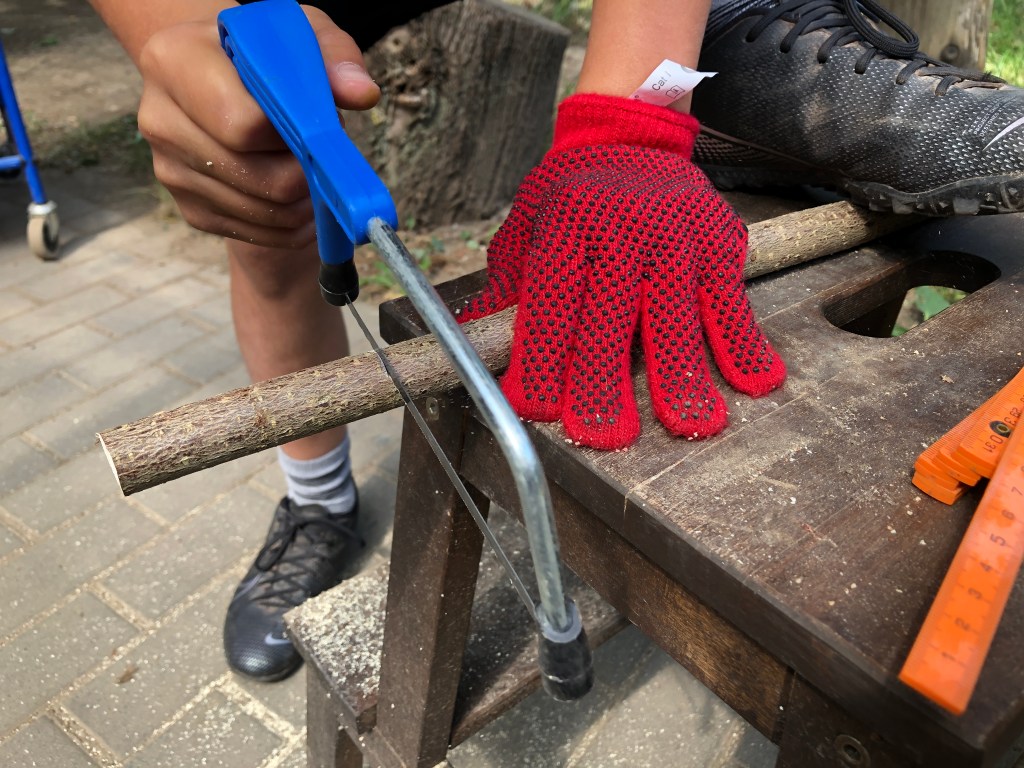
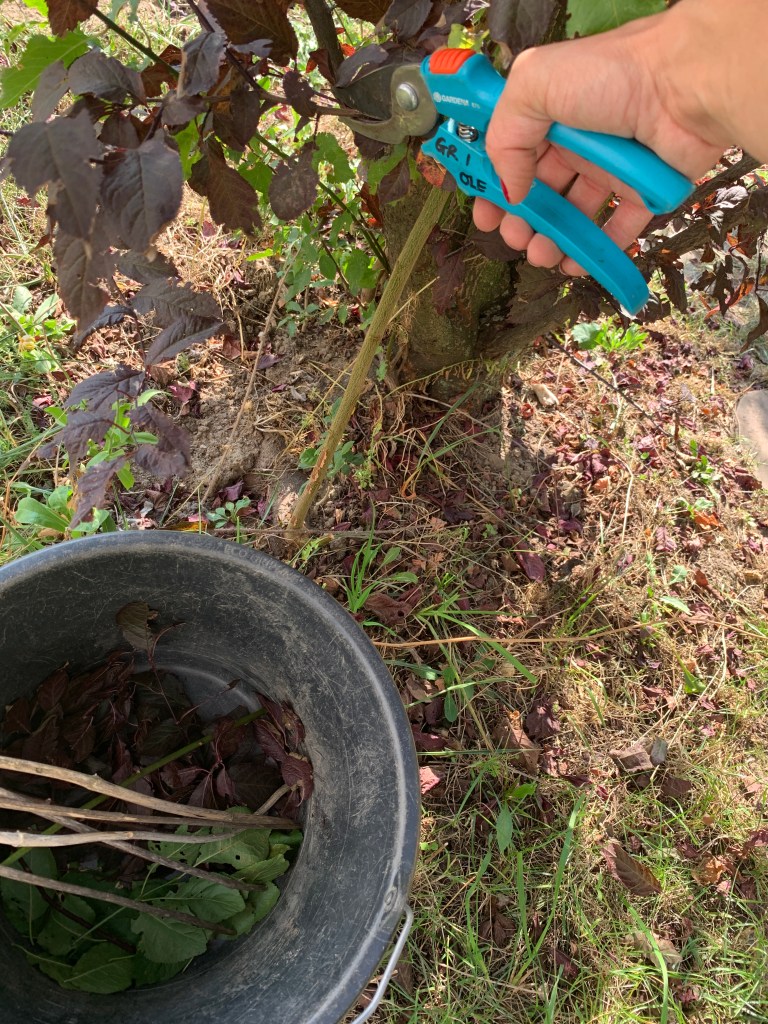
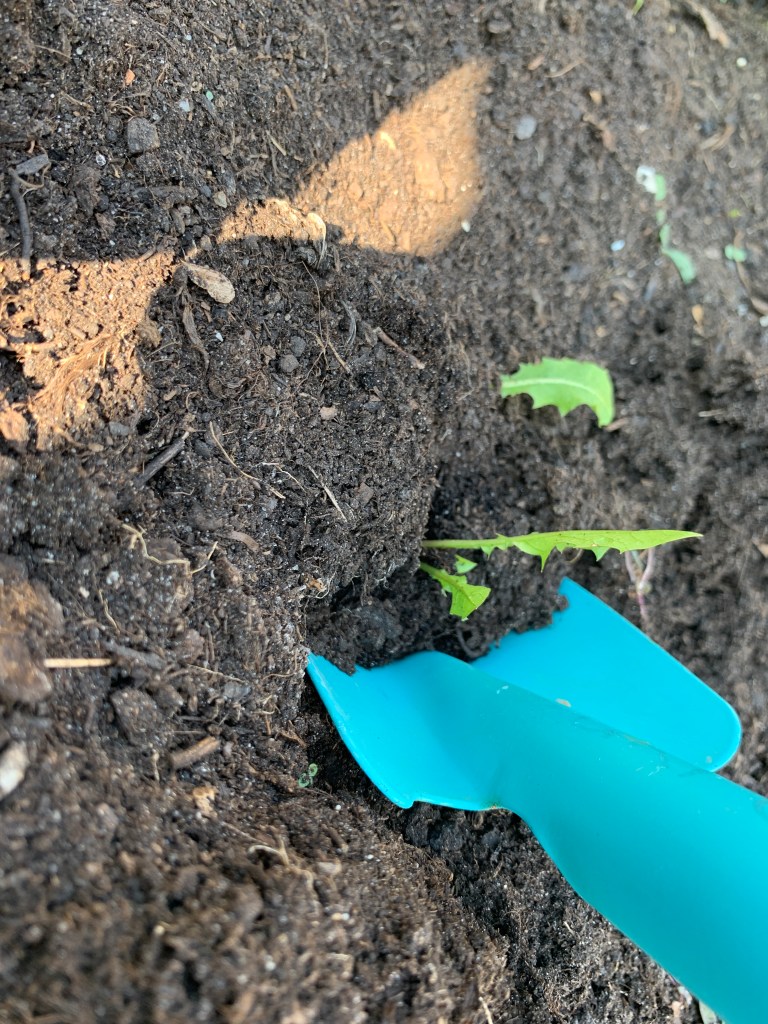
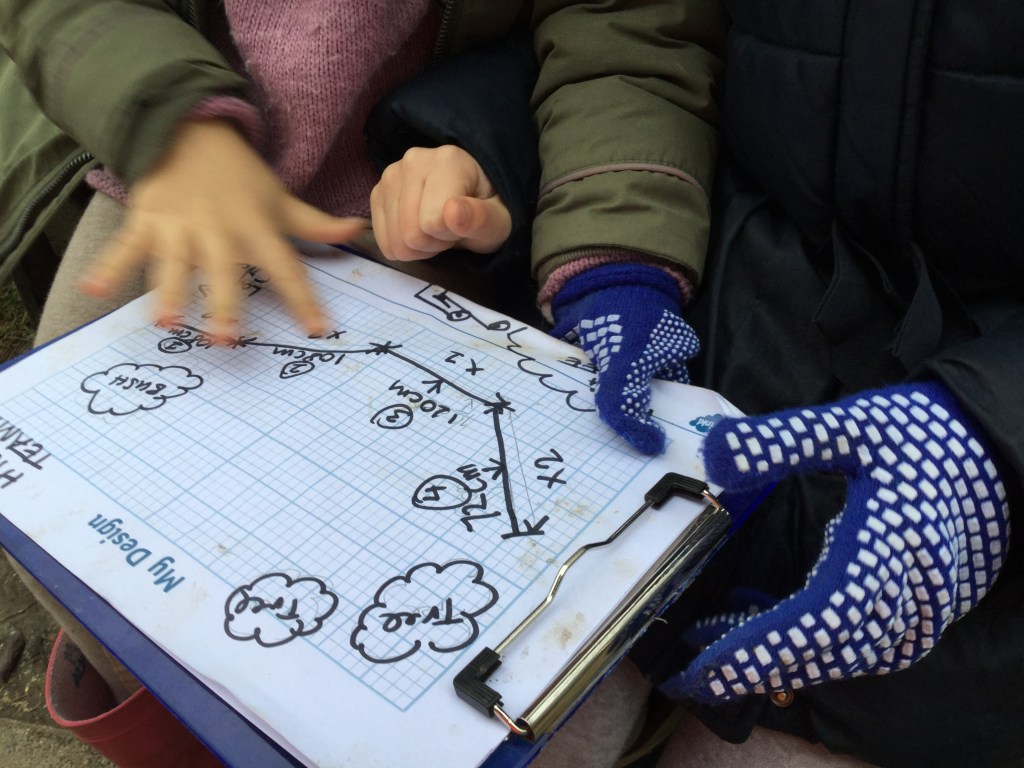
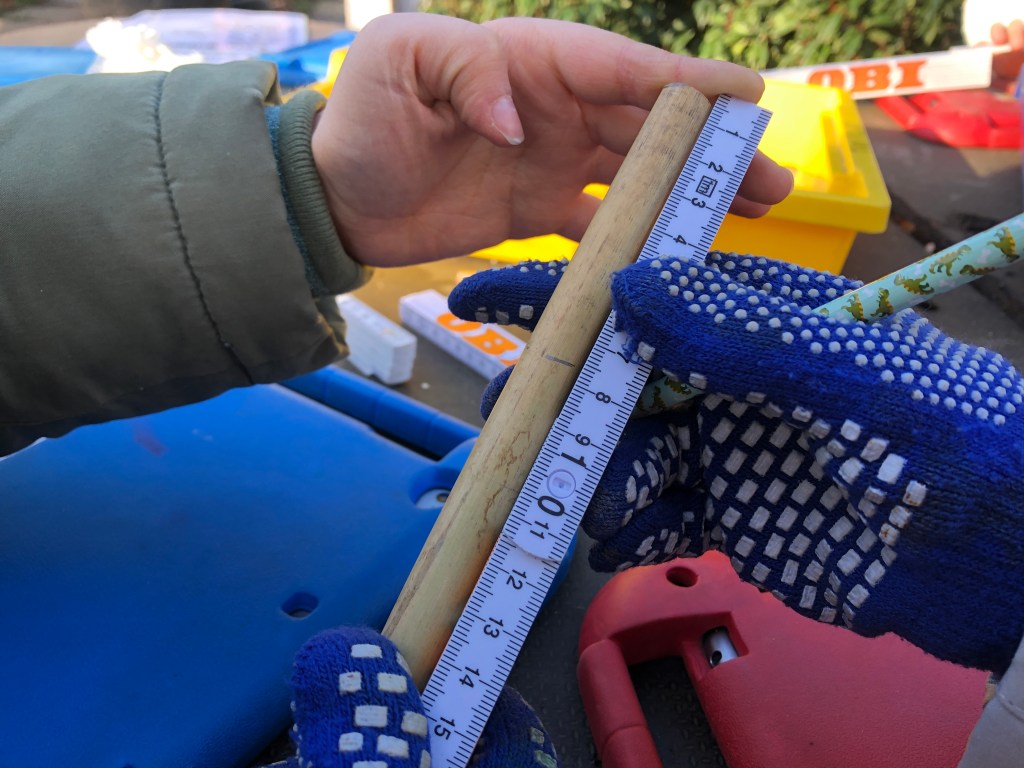
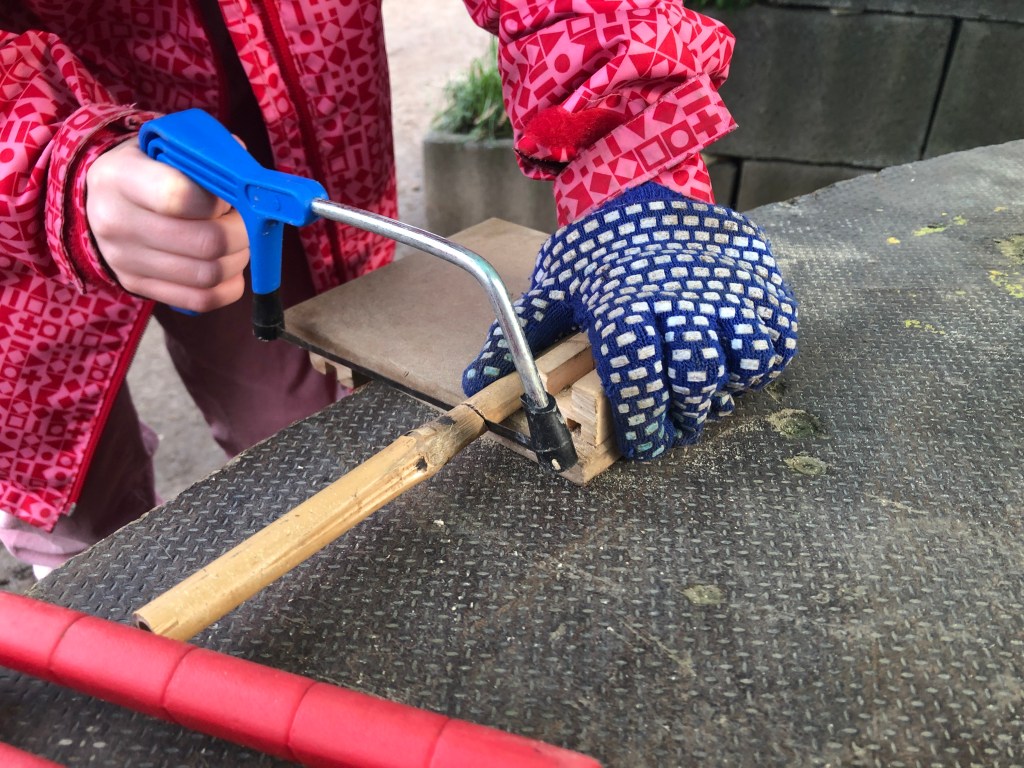
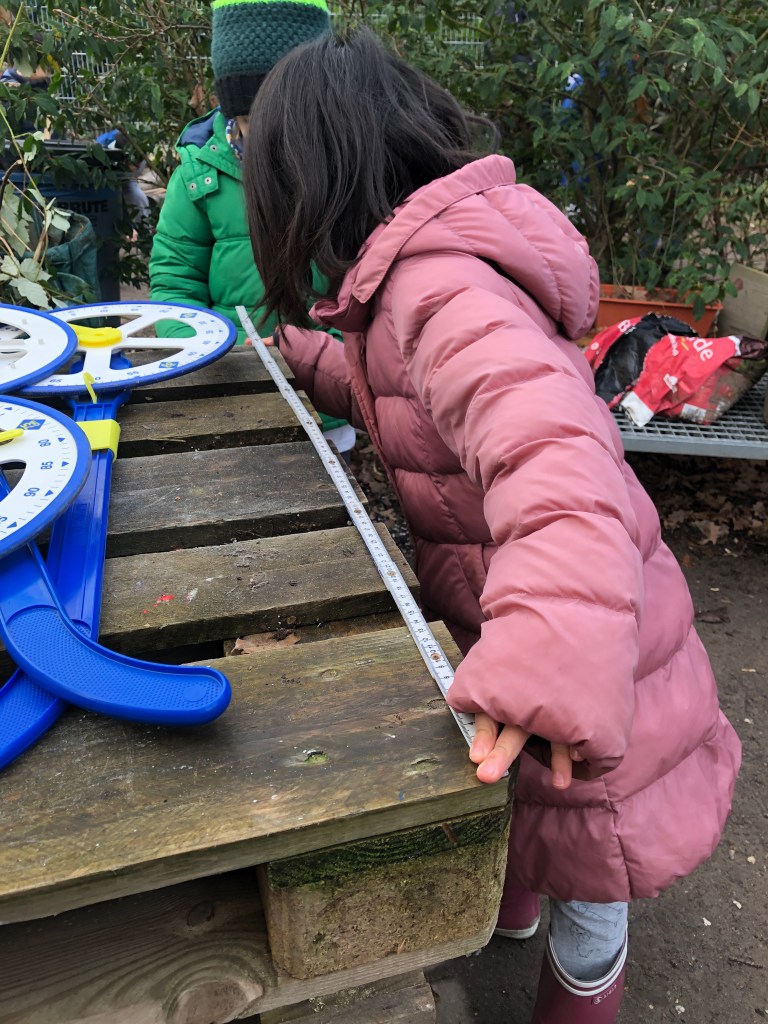
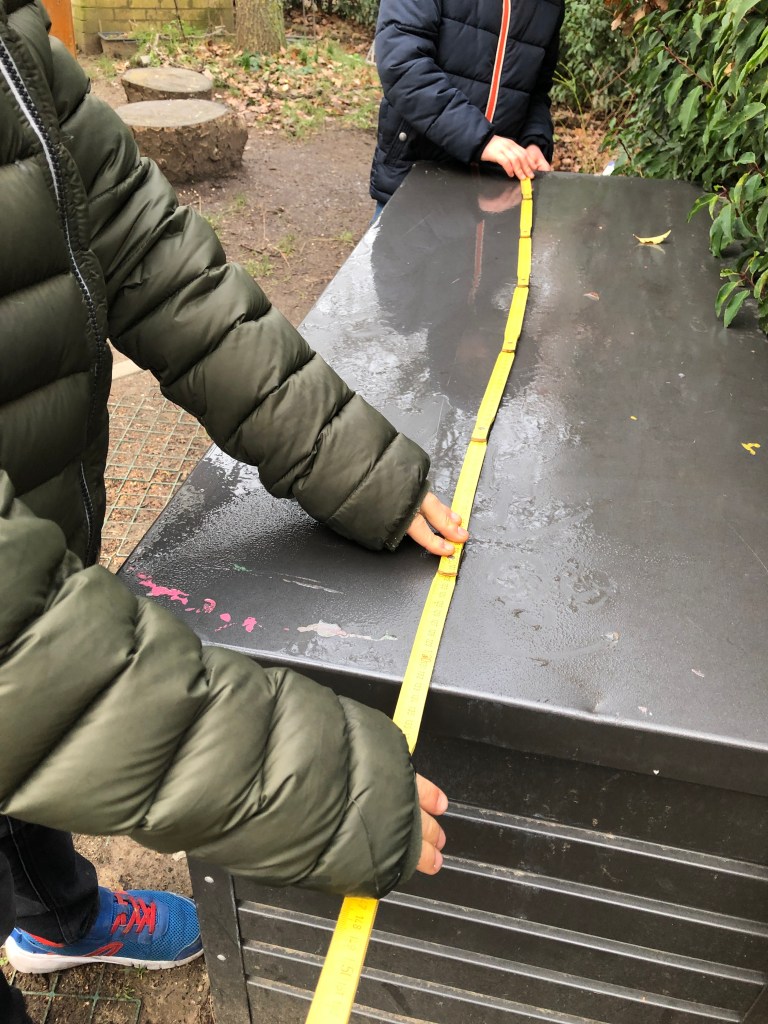
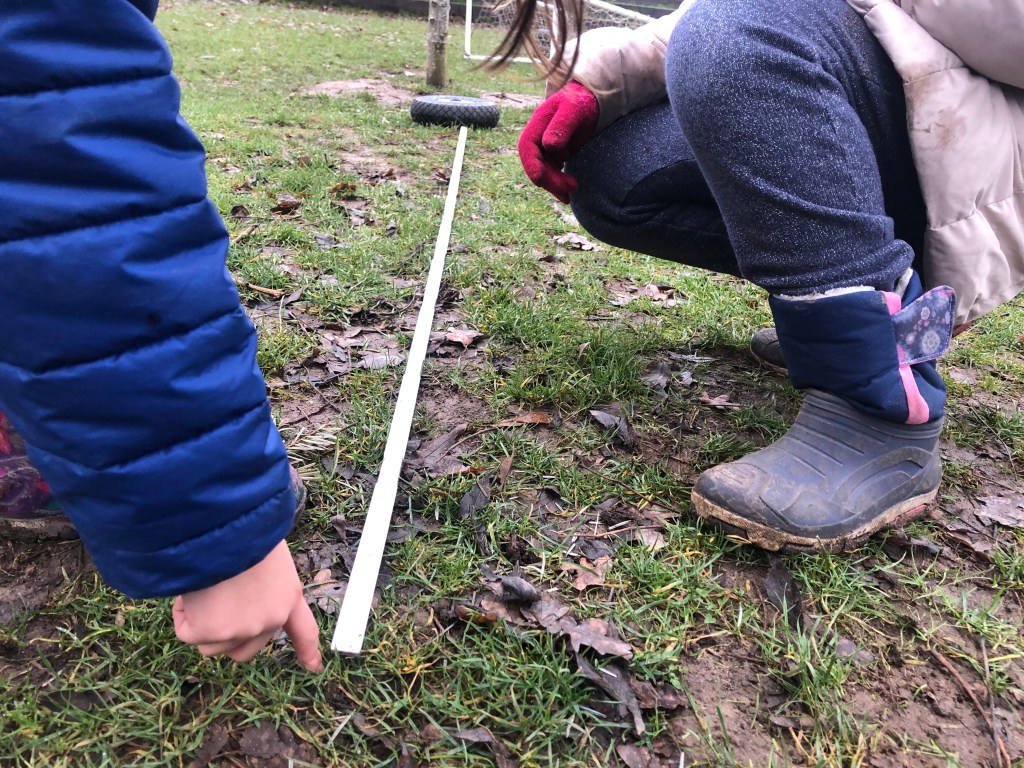
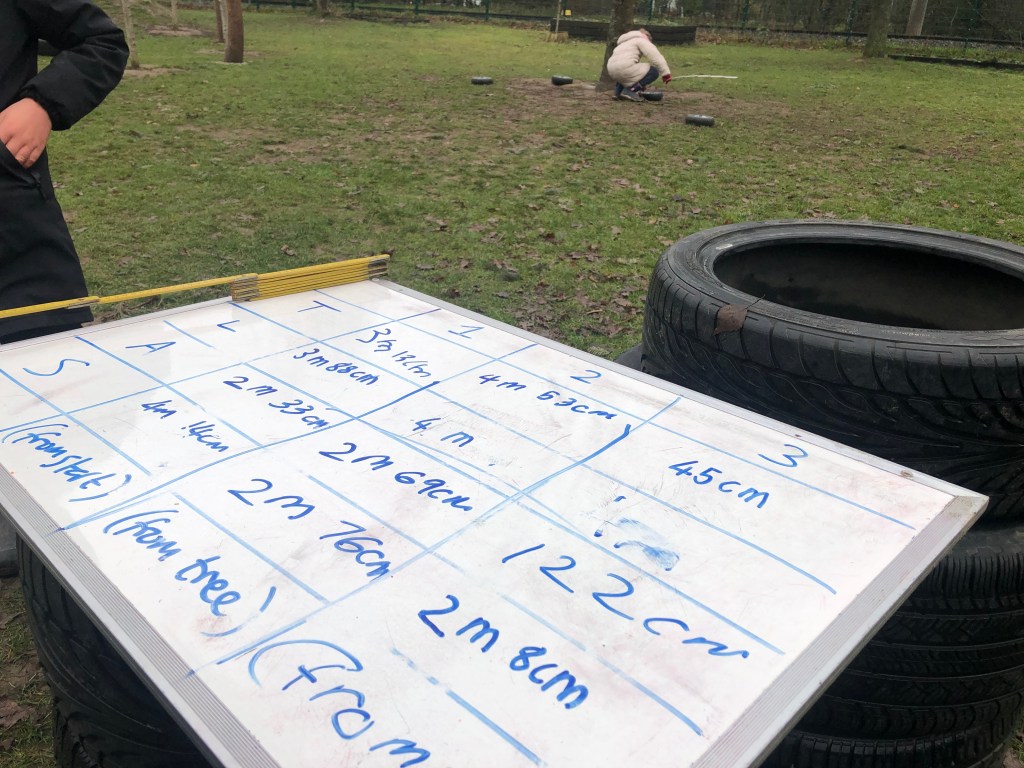
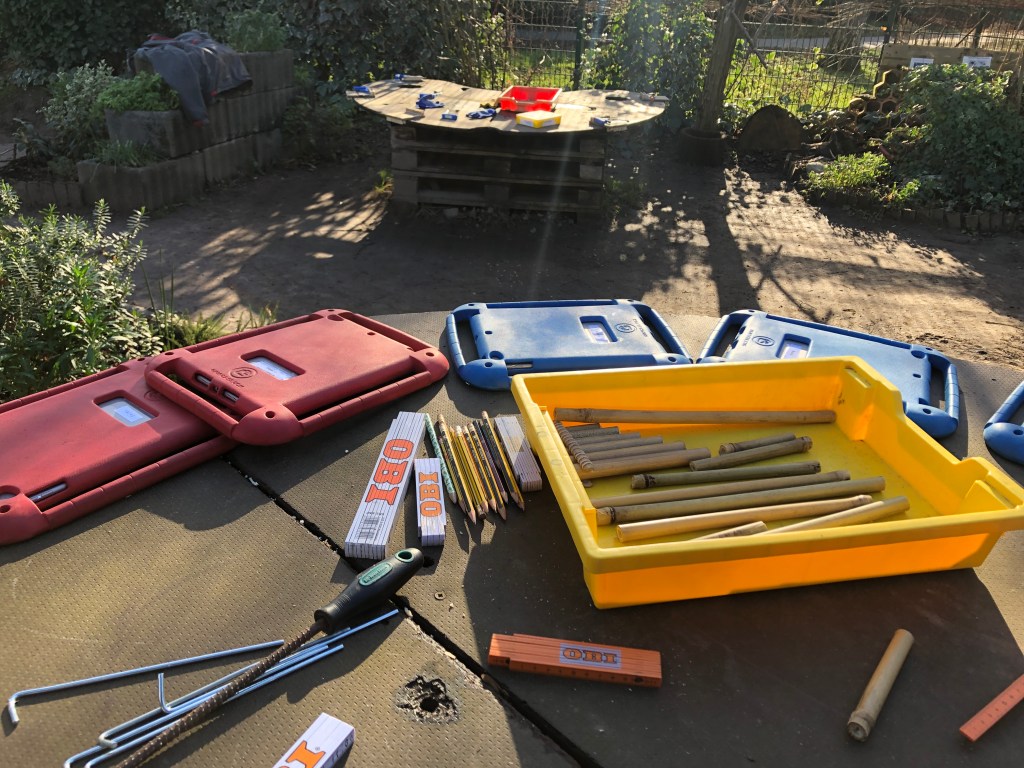
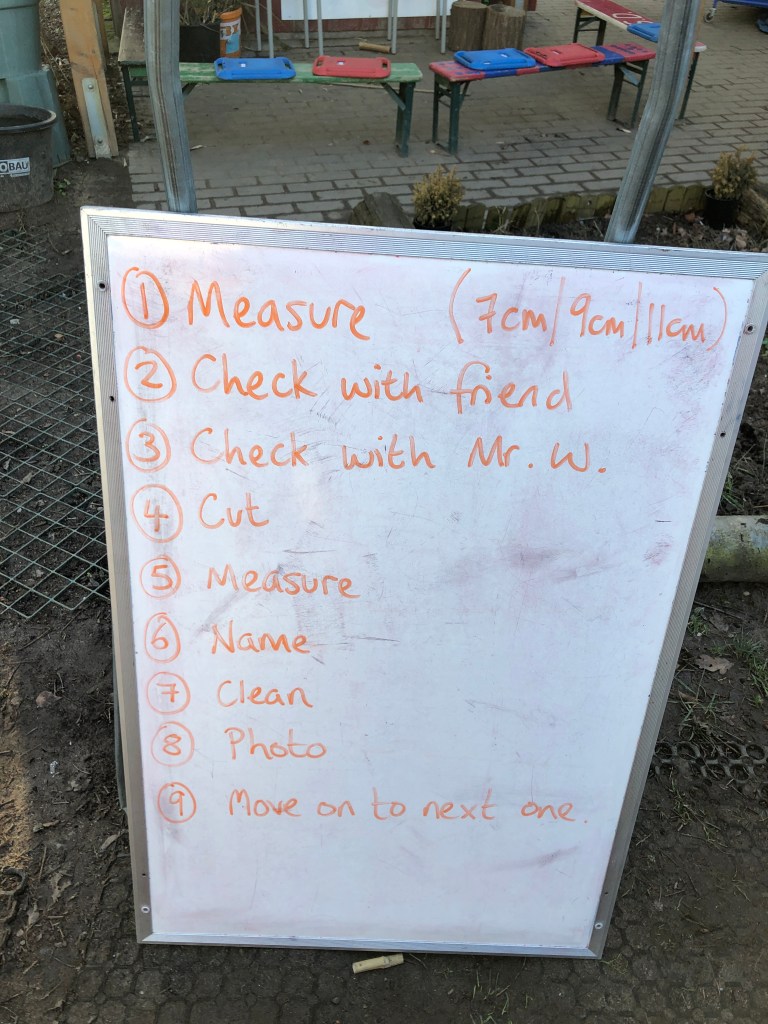
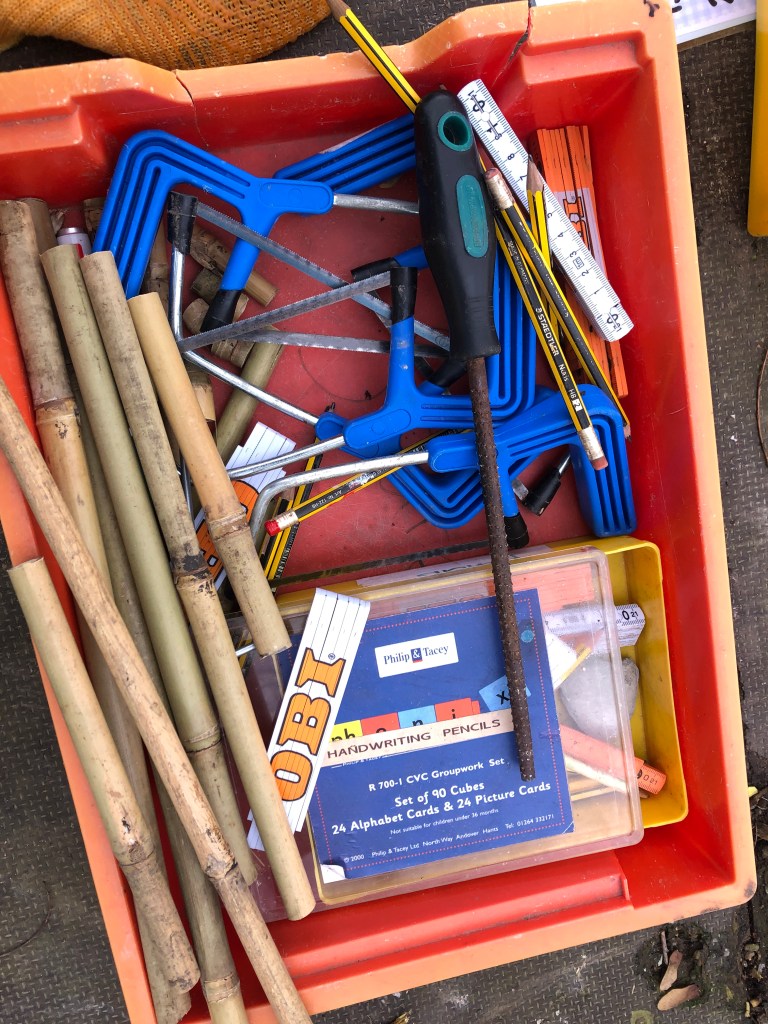
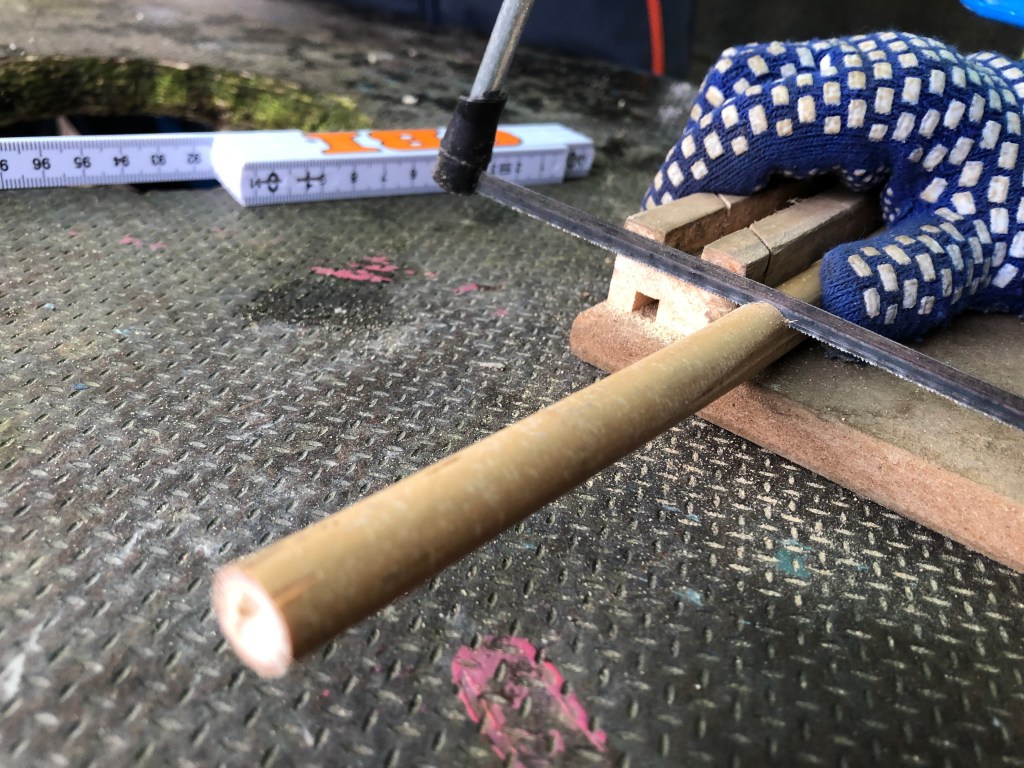
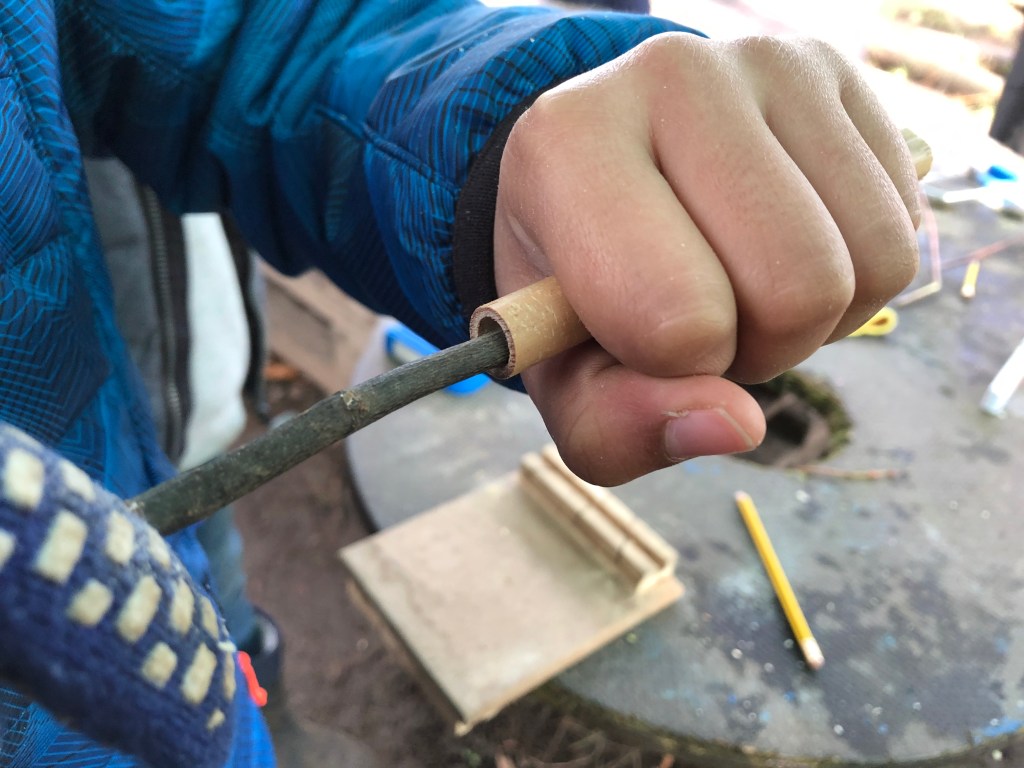
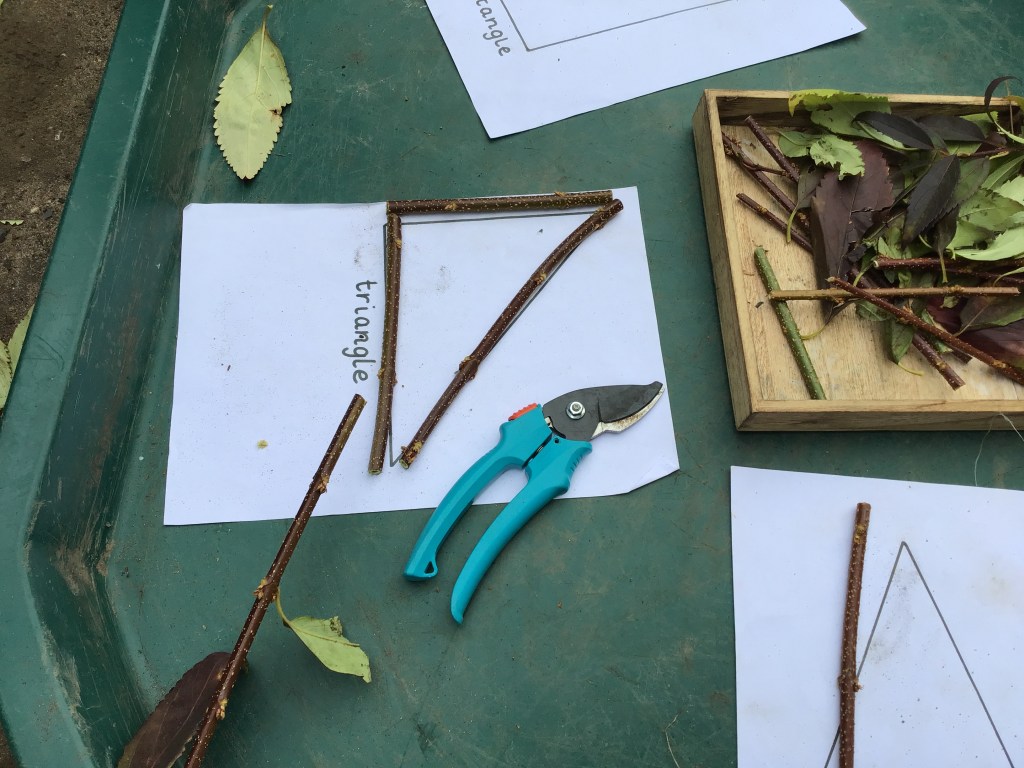
  • Add in some tool and measurement work by giving the children clippers and sticks. Using a pre-drawn template, children can measure the length of stick they need to cut to create each side of a given shape. 
  • Not sure what to do now with all the little sticks that have been cut? Use the sticks and air dry clay to make shape decorations. Count the sticks (sides) and balls of clay (corners) as you create! 
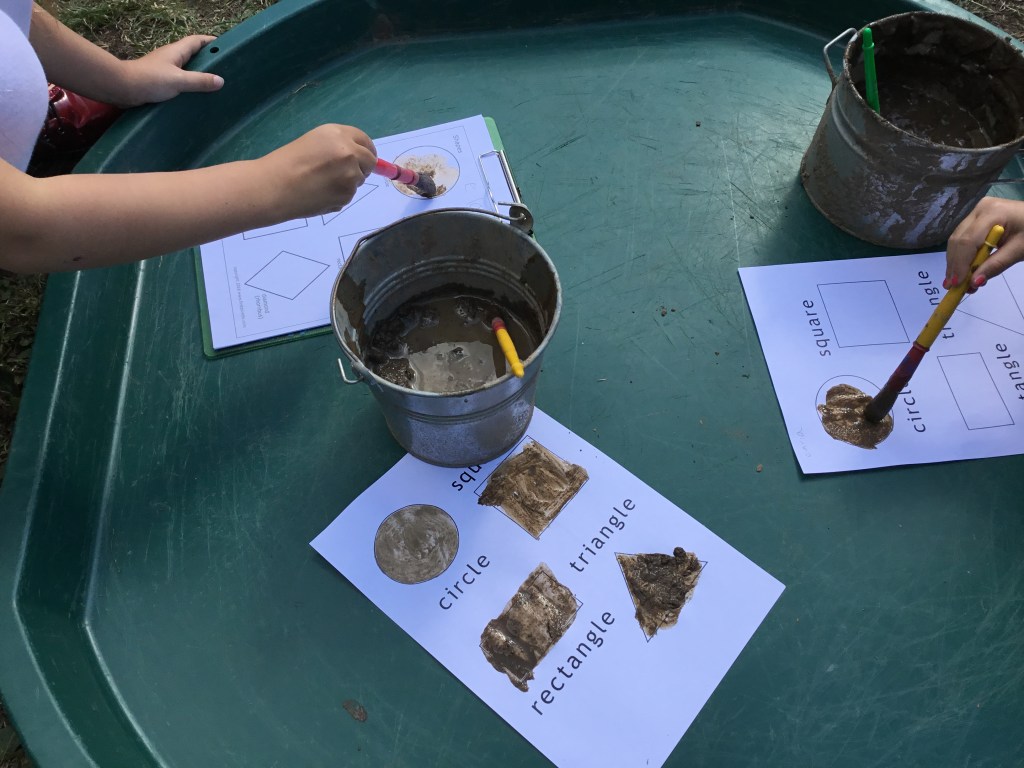
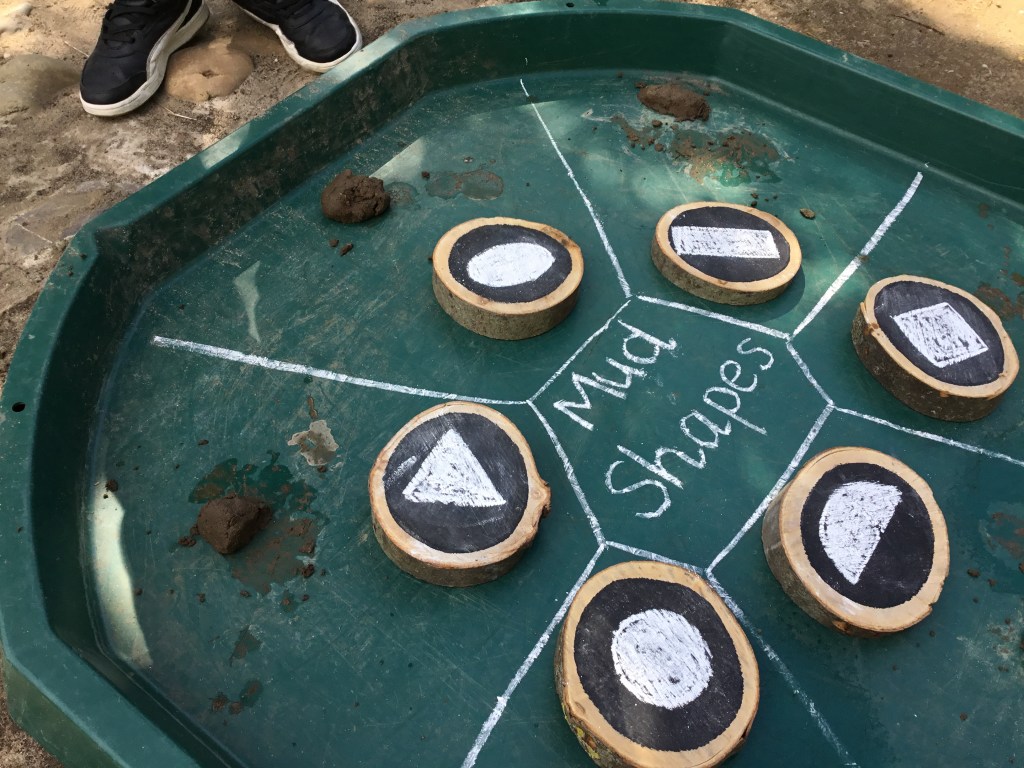
  • If you feel like getting a little messy, you can also bring out the mud! Mix it with water and get out the paint brushes to paint shapes, or create a thicker mud that you can mould with your hands to make many different shapes. 

Shape challenges

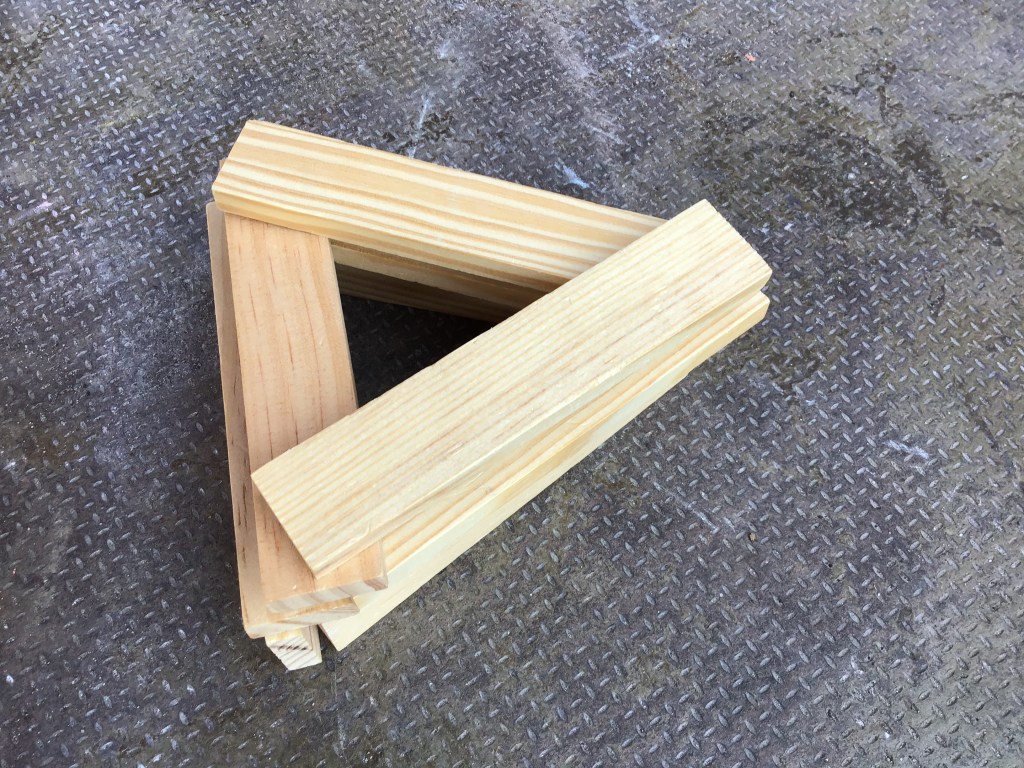
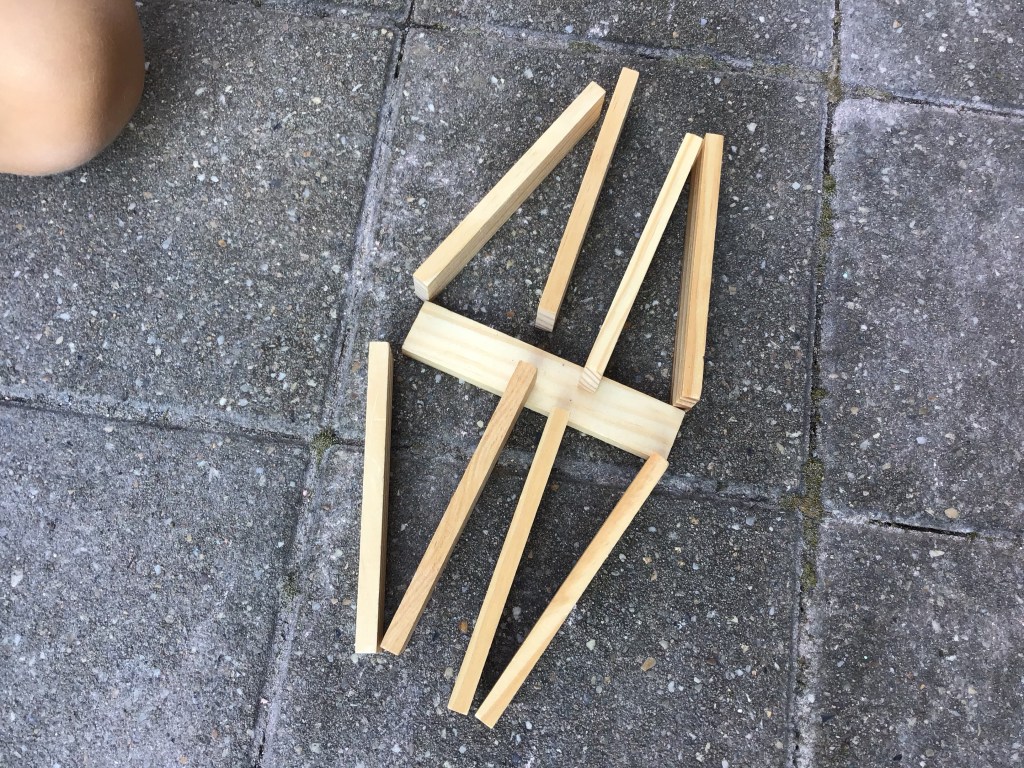
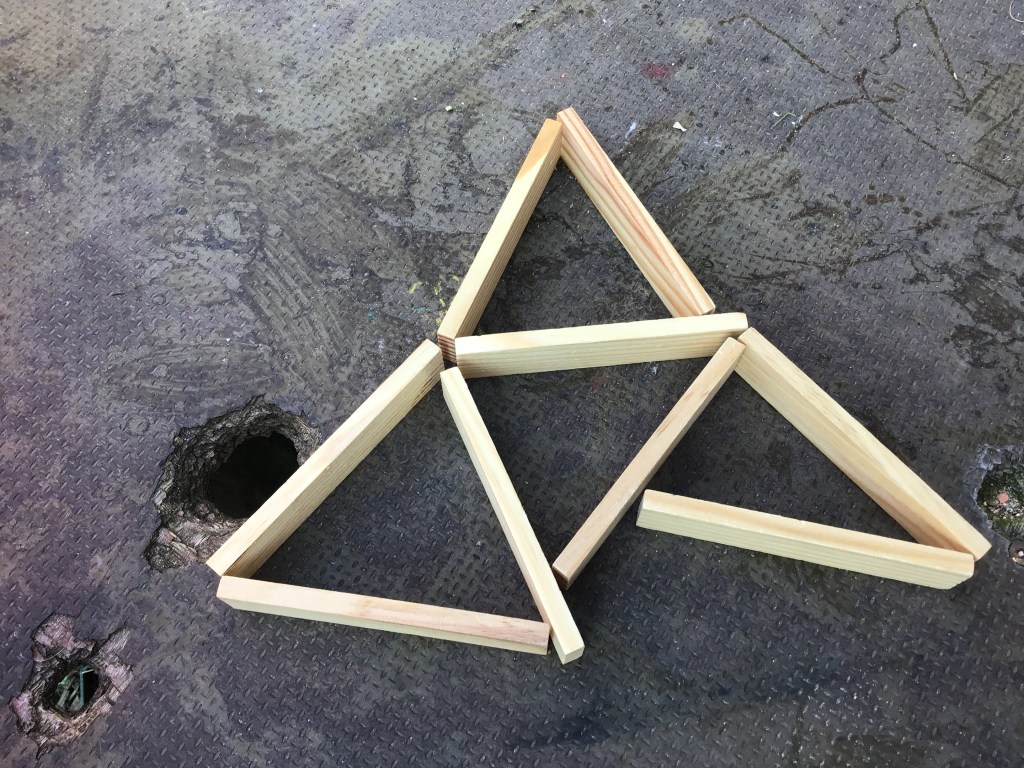
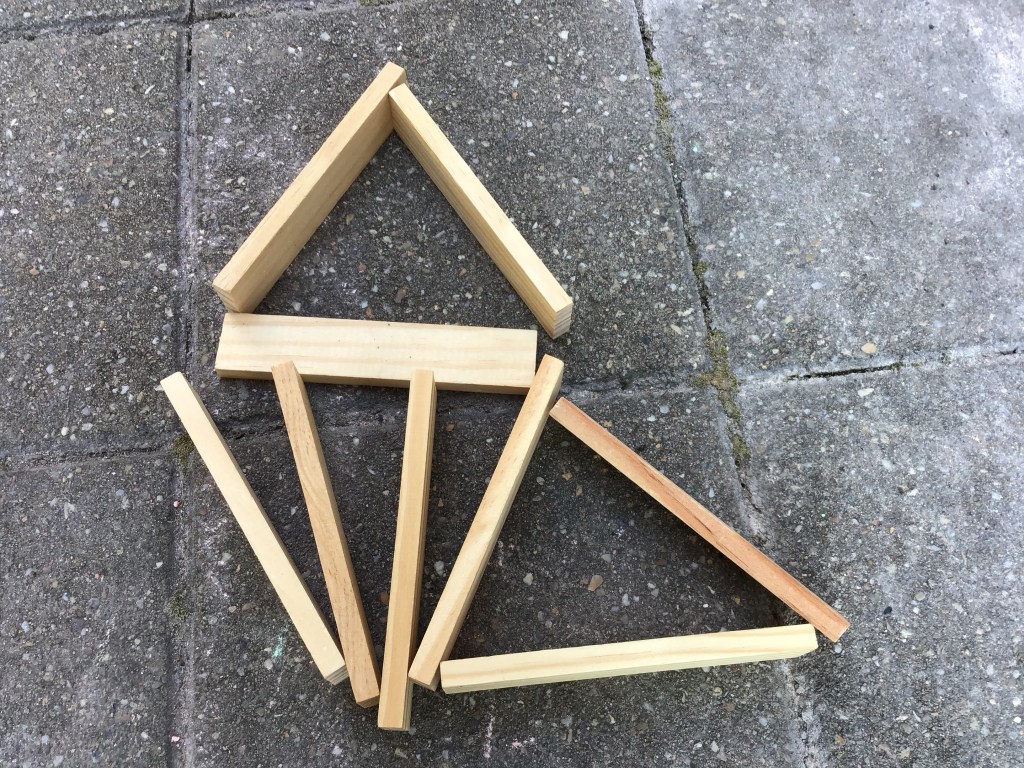
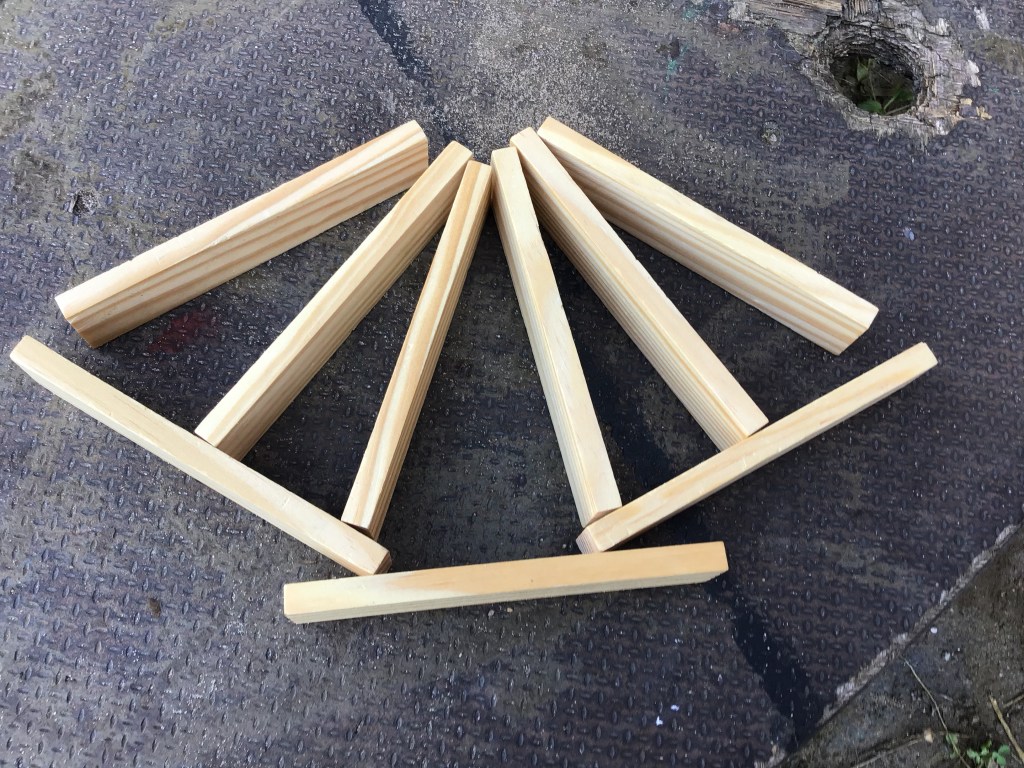
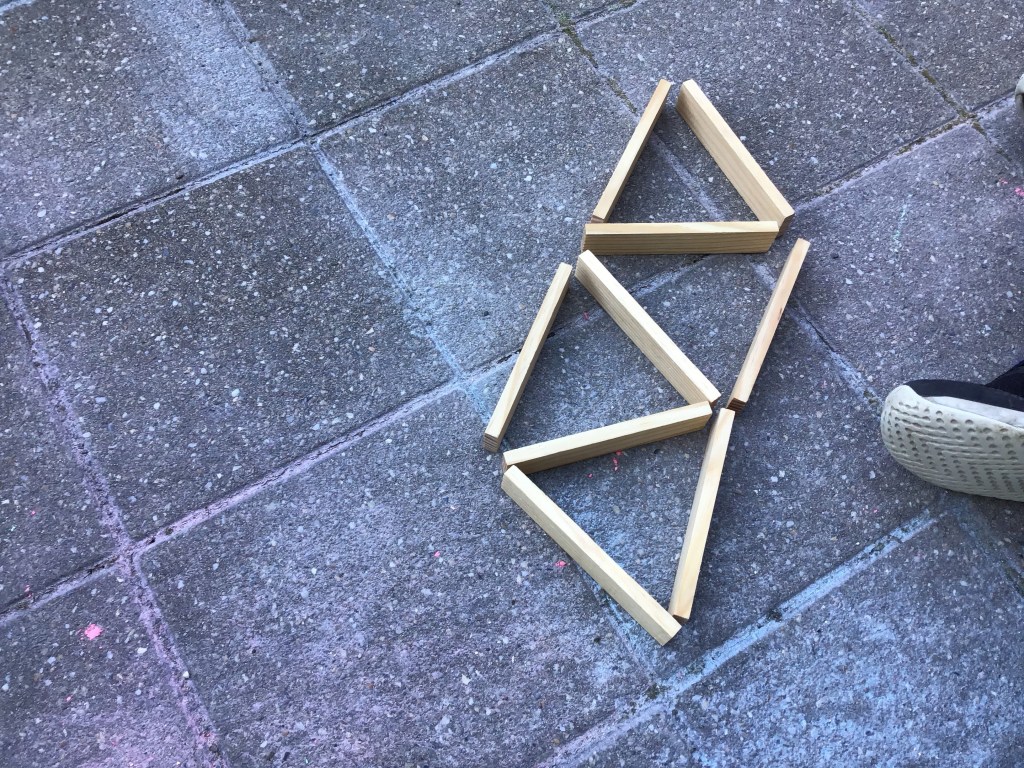
Looking for a brain teaser to get your students engaged? Try creating some challenges that allow them to think both mathematically and creatively. Here’s an example that always sparks excitement;

Using 9 sticks of equal length, can you create 1, 2, 3, 4 and 5 complete triangles?

For each challenge, children must use all 9 sticks. Once they have made 1 complete triangle, they can collect the sticks up and make 2 complete triangles using all 9 sticks and so on. It is always interesting to observe the different solutions that children create to solve each challenge. Sharing solutions together also allows students to learn from each other and have conversations about shape. 

Shape patterns

Shapes can also be used to create repeating patterns. You can explore shape, size, colour and orientation as you use natural materials to create and continue patterns. You can create transient patterns that can be tidied away at the end of the session, or make your patterns into decorations that can be hung from trees or donned as necklaces. 


So there you have it, whether you have 10 minutes or 10 sessions, there’s an activity that can bring learning about shape to life in a fun and practical way. 

Don’t Throw It Away! 7 Things To Make Out Of Your Christmas Tree In January

There’s nothing quite like bringing a real Christmas tree into your home over the festive season. The shape, the smell, the needles stabbing you in the feet. Whether you went with Pine, Spruce of Fir, eventually January will arrive and it will be time to let it go. There will also be a load of other people wanting to get rid. Hello, free resources! There are lots of things that you can make and to be honest, the sky is the limit. This blog post contains 7 ideas to get you started and spark your creativity. Make them yourself and make them with your children and students. Here’s to a positive start to 2021!

Now is the time to send out the call to your community for trees after the festive season comes to an end. Depending on your situation, you might be able to offer collection. Otherwise just ask people to deliver their trees so that you can use them to make awesome stuff! Some will, others won’t but if you don’t ask, you won’t get!

Important Note: All of the things in this post are going to give you opportunities to use tools with students. Take the time to introduce them properly and have conversations that are going to help students keep themselves and others safe. If you haven’t used sheath knives yet, check out our Knife Basics page.

Wooden Spinners

Check out this post in our Project Inspiration Series on How to Make Wooden Spinners. Whether you use it to incorporate measurement skills or you just want to have a massive ‘Nature Beyblade’ competition, this project is a win.

Log Santas

One use that we’ve found for a log cut on an angle is these adorable log Santas which students made to sell at our Grade 3 Christmas Market. Sawing the trunk on an angle provides you with a lovely, free-standing shape that you can do lots with. You can burn patterns, paint designs or simply write messages of 2021 positivity.

Harry Potter Wands

“It’s Levi-O-sa, not Levio-SAR.” Channel your inner geek and make something that you can pretend you bought at Ollivanders with Hagrid. Again, make sure that you’ve been to check out our Knife Basics before getting stuck in.

Small World Settings

Create some trees in your small world setting. Where else is it ok to have elephants and dinosaurs hanging out in the same place? Alternatively, you might want to season your most recent concoction in the mud kitchen with a sprinkle of magical needles. Let your imagination go wild!

Noughts and Crosses

Also known as ‘Tic Tac Toe’ by our friends across the pond, this is a cute little project which involves a fair amount of sawing. You’ll also need a soldering iron to create the lines on the board and pieces. Alternatively, this could be done with pens and markers. We used bow saws to cut the game board from the trunk and hacksaws to cut the counters from the thicker branches.

Baubles and Gift Tags

Being able to say that next year’s tree decorations or take-home-crafts are going to be made out of last year’s Christmas tree is pretty cool. And once you cut the discs, you can do anything with them that you like. Paint them, brand them or simply leave them au naturel. The sky is the limit.

Key Rings

Get some practise in with your concave cuts, thumb pushes and stop cuts. Oh, and there’s some drilling too. Check out this post from out Projection Inspiration Series on How To Make Wooden Key Rings.

Other uses for left over Christmas Trees

  • Burn it (cue creosote discussion here)
  • Protect plants from frost with it
  • Mulch it
  • Recycle it
  • Donate it to a good cause (e.g. in some places, they are used to reinforce sand dunes against erosion from the sea!)

So there you have it, a little inspiration for some of the things that you can make instead of just throwing out your Christmas Tree. If you’ve got any other ideas, we’d love to hear about them!

What is Geocaching and how can we use it enhance student learning?

If you haven’t heard of geocaching yet, you’re in for a treat. If you’ve heard of it but are wondering how to incorporate it into an authentic learning experience, then hold on tight. It’s great to do with a group of students, with your own kids or even just on your own. If you’re still looking for some inspiration for Outdoor Classroom Day this Thursday, you might be in luck!

With the app now available, Geocaching is no longer a “sport” reserved for anorak-wearing, GPS-toting stamp collectors. It’s more accessible than ever and it’s actually pretty cool. So, how can we use this real-world treasure hunt to ignite curiosity and wonder in our students and children? What better way to discuss with children that there is far more going on around them, if only they’d divert their attention to it! Here’s a brief overview of Geocaching and 3 ways that we’ve utilised it to enhance student learning.

What is it?

According to their website, Geocaching is a real-world treasure hunt happening right now all around you. With 3 million caches in 191 countries across the world, the chances are that there is one pretty close to you right now. There are a variety of different caches that you can find, the simplest type generally consisting of a hidden plastic container holding a logbook. But if you’re lucky, you might find coins for swapping and a variety of trackable travel bugs too.

To access the Geocaching database, you download the app, register with an email address and start searching. If you really get the bug, you can the pay €29/year (or equivalent in your local currency) for the premium membership which gives you access to more, better quality caches.

A note on ‘Muggles’: Geocaching uses the word ‘Muggles’ to refer to non-geocachers and sometimes a cache description will even contain a warning of ‘high muggle activity’. To a ‘muggle’, someone looking under a bench or sticking their head in a bush could look a little odd. It can spark curiosity and in the past, ‘Muggles’ have been known to remove or damage geocaches.

1) Get out there

In the past, we’ve used a world map and started with a discussion about latitude and longitude. Once you’ve uncovered the fact that people use these complicated numbers play a treasure hunting game, curiosity is peaking and it’s time to get out there.

To keep it simple, we tend to stick with traditional caches. Because caches come in all shapes and sizes, the hunt can be a rollercoaster of emotions. A black cylinder hidden under a rock might be easy to find. On the other hand, searching for a magnetic nano which is no larger than your thumbnail might have you rethinking your life choices to date.

Whether you’re heading out with a group of students or just your own children, it’s important to have a discussion about the expectations for the activity beforehand. As it’s a game played by people all over the world, there is an inherent responsibility to leave caches how we find them so that they can be found by others afterwards.

Homemade Geocaches on one of our GPS units

If you’re worried about students interfering with Geocaches, another option is to create your own. This is more labour intensive for you, but it can also be a lot of fun. If you have some GPS devices, you can input locations to allow students to find caches or it’s also possible to have a printed sheet with a map and relevant details. Approaching it this way means that you could set up your own series of geocaches around your school grounds which would not be part of the Geocaching database and therefore less affected by post-lesson interference…

2) Create your own

Creating your own geocaches is a great. Each cache on the app comes with a whole host of information which can be easily replicated in a student-friendly way to encourage writing.

Finding a suitable hiding place comes first. Provide your students with a selection of containers, as well as the tools to camouflage and hide their cache and see what they come up with. Magnets are always a popular choice but the more variety the better. If your Geocaching adventure only included a couple of simple finds, you can give them photos of more examples to get their creative juices flowing.

Once hidden, our students use Book Creator to make their Geocache pages which can be then shared with others that go in search of the cache. We take the time to deconstruct and analyse what this page needs to include and we usually come up with the following:

  • Size, difficulty & terrain ratings
  • Location information
  • History of the area
  • Muggle warning
  • Hint
  • Map/directions

One year, these even featured as part of our Student-Led Learning Conferences. Students hid the caches and then parents had to interpret the pages before heading out on the hunt.

3) Travel Bug Race

A travel bug is a piece of metal with a code on it (affiliate link) which can be tracked through the geocaching system as it gets moved across the world by different people. One year, we bought one per 4th grade class and equipped each one with its own personalised 3D printed tag. They were all dropped in a “TB-Hotel” in the centre of Düsseldorf with the goal of being the first to reach 10,000miles. The passing of time over the next weeks and months did little to quell the student’s enthusiasm. To be honest, they didn’t want to talk about much else. “Never mind your benefit risk assessment, where is our Travel Bug now and are we winning?”

Being an International School, students usually have a fairly good awareness of different countries in the world and our connections to them. That being said, using the tracker bug race helps our students to further develop an appreciation for where we are in the world.


So there you have it, a brief overview of Geocaching and how you might be able to work it into your own Outdoor Learning program. Get out there and find those hidden treasures. Stay safe.

Project Inspiration: How To Make Wooden Key Rings

As our global pandemic continues, we are sending our best wishes and positive energy your way. We hope you are well and that your spirits are high. Something that might help is reading this article from the Centre for Disease Control which supports how important it is to keep doing what we do in these crazy times!

Now, on with the post. This project is great for developing knife skills beyond the pointy stick. By using stop cuts and concave cuts, it is an excellent next step for those students motivated to take their whittling skills to the next level. If you haven’t used knives with students before, head to our Knife Basics page. Make sure your knives are sharp and your wood is fresh, and let’s go!

A note on COVID19

We made this project near the end of our last school year. Only just back in school after our COVID19 lockdown, we were looking for hands on projects to balance the amount of time spent on screens during our Home Learning programme. Our system for tools was anything that had been used ended up on the “unhappy” side of the table where it was disinfected and moved to the “happy” side. Any tools on the “happy” side were fair game.

Step 1) Gather Materials

As with our post on How to Make Wooden Spinners, the wood for this can be anything that you have lying around. We used bits of hazel and also the thicker branches that we had leftover from our Christmas tree haul. Diameters of 1.5cm up to 2.5cm are good. Too thin and the project can crack during the drilling process. Too thick and your keyring can get a little bit too chunky to be fit for purpose. As always, the fresher your wood, the easier it will be to carve. Avoiding harder woods, such as oak, will also set your students up for carving success.

Step 2) Measure and Cut

Get those measuring sticks out. We went with 8cm in length. In actual fact, the measuring process is not really necessary, but any opportunity to get our students using their measuring skills in an authentic context is a win. “Measure twice, cut once” and then hacksaws at the ready. If your students haven’t had much sawing experience, put yourself in a position to assist or give them some time to practise.

Top sawing tips: Glove on the “helping hand” and maintain those space bubbles.

Step 3) Carve one end flat

This step involves using concave cuts to create a flat surface on one end of your stick using a sheath knife. Concave cuts, according to Richard Irvine in his awesome whittling book Forest Craft (affiliate link), requires changing the angle of the blade as it moves through the wood. We find it useful for our students to connect this action to that of accelerating on a motorbike (insert sound effects as appropriate).

Step 4) Drill the hole

Our hand drills have 5mm bits, but you can play around with different sizes that you have. A round file can be useful for making small holes bigger if you think you need to. Aim to get your hole as central as possible and be careful not drill too close to the top of your stick, as this may cause the project to crack.

Top drilling tips: Glove on the “helping hand” and find a table or surface to drill onto. Avoid pushing the drill towards you hand.

Step 5) Decorate

Once the hole is drilled, it’s time to decorate. Whether you want remove all of your bark or create patterns using stop cuts, the world is your oyster. A stop cut involves creating a line or cut which is perpendicular to the direction that you are carving. Do this by turning the stick 90 degrees then pushing and rolling it along the blade of the knife. When you rotate back and carve towards the line, your blade should stop at the line and give you a nice clean finish. This is the theory. It can take a bit of practise to get the stop cut deep enough and there will be times when the blade does not stop. When this happens with students, encourage them to incorporate the “mistake” and alter their design.

When we made this project, some students really took their time on the detail while others carved all of the bark off in minutes and then proceeded to make another keyring for their sibling, and then mother, father, grandma and cat.

Top tip: Drill holes before decorating. Sometimes, the stick can split during the drilling process and it’s pretty soul destroying if you’ve already decorated and then you need to start over!

Step 6) Add the ring

The final step is to thread your creation onto the metal ring. Depending on the dexterity and fine motor control of your students, you might need to assist with this. The minute you find a student who can do this independently, make them your expert and then pop the kettle on.


So there you have it, the third post in our Project Inspiration series. Stay safe, stay healthy and start creating.

Autumn Treasures: Collecting and Using Natural Supplies

Autumn is an exciting time of the year for replenishing your natural supplies. Whether you are walking in the forest or along the road, the ground becomes a treasure chest for all those who look closely.

Conker picking used to be one of my favourite things to do every Autumn. As children, we would wrap up, grab a bag and splash through puddles on the way to finding the best Horse Chestnut tree in the local area. Of course, the best tree was in someone’s garden and every year they kindly turned a blind eye whilst groups of children clambered over the wall to collect the shiniest brown conkers from their lawn. It is therefore, something I look forward to doing with my class each year. Luckily we have a Horse Chestnut tree just outside of our school grounds and plenty of conkers fall on the footpath preventing the need for skirting over fences (although the neighbours did invite us into their garden one year).

There are so many other amazing treasures to be found depending on your local environment. From pine cones to acorns, sycamore seeds to wonderfully coloured leaves, you will return with brimming buckets and excited children.

So the walk was wonderful but what now? Here are 4 ways that you can enjoy exploring your collections.

Observing and asking questions

This can of course happen whilst you are out on your walk, as children spot unfamiliar or interesting objects. If you have lots of time, you can take magnifying glasses with you and encourage children to wander slowly, noticing tiny details in nature. Listen carefully to the questions your children ask and discuss possible answers or predictions. Note down some of the questions to research together later with books or a quick Google search. If you are short on time, keep the collected objects and spend time at the beginning of the next session observing your finds and asking questions as a group.

Sorting and comparing

How many different ways can you sort the objects? By length, colour, shape, type of object, tree it fell from etc. Challenge the children to come up with as many different ways to sort the objects and see if you can guess their rule. You can also compare the different types of seeds that you found and explore how and why seeds are different to each other.

Counting and estimating

Want to explore larger numbers? Challenge the children to estimate and count how many conkers/acorns you collected. Last year we had a very competitive ‘Guess how many conkers we collected’ competition in Grade 1. Each week we gave the children a new clue, for example; showing what 100 conkers looked like, and children were invited to make a revised estimate. In the end one child estimated exactly the right number- 576!

Arts and Crafts

Arrange them, roll them, stamp them, print them; there are so many different wonderful art and craft activities that you can do with natural materials! Learn about why leaves change colour and create Autumn coloured pictures or print leaves onto air dry clay and make decorations for your shelter. It’s time to get creative, get messy, and have fun!


So there you have it, a few ways to enjoy what nature has to offer this Autumn. I wonder what you will do with your collections?

Outdoor Superheroes: You know you’re an Outdoor Learning Teacher when…

I recently heard Fran Prolman compare Teachers to Superheroes as they take on many roles everyday in order to shape and change the lives of students. It made me smile at the time and I often think about this in my role as an Outdoor Learning Teacher. From building sheds to creating ponds, I have not only developed my teaching practice in the Outdoor Learning Environment, but I have gained knowledge and skills in many other areas too. 

So, as the new school year begins, let’s take a moment to celebrate all the Outdoor Learning Superheroes, taking on the elements and inspiring children’s curiosity and love for nature. Whether you are a well-weathered superhero or are just starting your journey, you will know that you’re an Outdoor Learning Teacher when…

You’re a Gardener

You spend your free periods, evenings and weekends maintaining your learning space. Whether you’re the next Monty Don or doing just enough to keep your space alive, gardening is a continuous part of your job. From times of rapid growth, to times of drought and storms, the outdoor learning environment is continuously changing and gardening throughout the seasons is always full of challenges and surprises.

You’re a master craftsman… in the making

Gone are the days when you could walk past a skip full of wood without stopping for a peek. You have the DIY bug and can repurpose almost any materials to make tool tables, mud kitchens, and meeting areas to enhance your learning space. 

You’re a Weather Forecaster

You check the weather more often than your social media. You know the risk you run when planning a lesson with chalk mid-September and spend the week checking, and re-checking, the weather to make sure that your lesson is not going to be a literal wash out. 

You also play the role of weatherman/ woman for children everyday and have the superhero task of convincing 30 plus 6 year olds that “yes, you will need a raincoat today.” 

You’re a Waste Disposal Technician

Without the luxury of daily cleaners, your garden waste quickly piles up and you now have a second career in waste disposal. You can often be seen, with a line of children, ferrying leaf bags to and from the bin store.

You’re an advocate for Outdoor Learning

You find yourself explaining what Outdoor Learning “actually means” every time you meet a new person. As it doesn’t fall neatly into one single subject that can be easily described, you spend time justifying the importance of Outdoor Learning, not only for students’ social and emotional well being but in regards to academic progress too. 

So there you have it; five everyday additional tasks that make us Outdoor Learning Superheroes. So, grab your cape and show the world what you do. 

If We Chop Down This Tree, Will We Kill Our Librarian? Authentic Opportunities For Taking Measurement Outdoors

I think I can count on one hand the number of times that, as an adult, I have needed to measure a shape that is printed on a piece of paper. Research tells us that authentic learning experiences are the way forward. It suggests that enabling learners to put their skills and knowledge to practical use in a situation where the outcome has a tangible relevance to their own lives, results in far greater retention of knowledge. It’s time to get authentic with measurement. Don’t panic! The great news is that out of all of the ways to learn mathematical concepts in an outdoor environment, measurement is one of the easiest places to start. Here are six ways, which can be adapted to suit your setting, for taking measurement outdoors in an authentic way. 

Pose a Problem

If we chop down this tree, will we kill our librarian? What do we need to calculate to make sure that Mr Crouch will be ok? Hopefully, the students will figure out that they need to measure the height of the tree and also the distance between the school building and the base of the tree. You can then use “10 ways to measure a tree” from OutdoorClassroomDay.org.uk to help you calculate your librarian’s life expectancy. With older students, and if you really want to really get into it, you could bring in some trigonometry and have the conversation about how the top of the school building is further away than the base because the hypotenuse of the triangle is longer than its base… blah, blah, maths, maths.

No librarians were harmed in the writing of this blog.

Make Stuff

Not many things give students more motivation to improve their measuring accuracy than having a hands-on project to work on. From bamboo panpipes and birdhouses to wooden spinners and raised beds. It doesn’t really matter what you create as long as you prepare yourself to make the most of the activity through the lens of measurement. Using the phrase “measure twice, cut once” is useful when encouraging students to focus on their accuracy.

Find a Purpose

Recently, we were contacted by another international school who are in the process of developing their outdoor learning space. They wanted to know the height of our tables and also the size of our student-friendly rakes. What followed was a task for our 2nd grade students where they had to measure and record a variety of objects in our space. Sometimes in centimetres, sometimes metres and sometimes a mixture of the two. Everything was measured, from the height of bushes to the length and width of our entire space. Some students even moved onto finding the perimeter of the planters in our vegetable garden. It’s safe to say that the inquiring international school received slightly more information back than they asked for. In summary, find a task that has an authentic purpose and see where it takes you!

Magic Number

Using a thermometer in your outdoor space (insert reading scales discussion here if necessary), find the day’s temperature to the nearest degree in celsius. This is your magic number. Send your students out into the space armed with measuring tools and challenge them to find objects that are the same length in centimetres as the magic number. For example, if the day’s temperature is 7 degrees, students are looking for objects that have a dimension of 7cm. This can be a very different task depending on the season. If you’re in a country which favours fahrenheit over celsius, then it’s going to look very different again.

This activity is one of our favourites because it offers a switch around in the focus of measurement. Instead of measuring one object to find its length, students need to measure lots of objects in their search for the elusive magic number. Use it as a starter and extend it as you wish.

Plant Things

Here’s an idea for those among us who have higher OCD tendencies. Incorporate measurement into whatever you’re planting and the result can be a wonderfully ordered vegetable bed or flower garden. This year, we spaced our tulip bulbs 10cm apart. Unfortunately, with all of our students being at home during Covid-19 lockdown, the closest they got to their beautifully spaced flowers was seeing a picture of them!

Measuring can also come into play when comparing the height of growth. This came in particularly handy during the aforementioned lockdown. Those of you who read the blog post about our Home Learning a couple of weeks ago will know that we sent bean seeds home when everything kicked off a couple of months. Keeping track of growth and comparing this during our ZOOM meetings has been part of our Home Learning process.

Get Your Game Face on

In a similar way to making projects, measurement can be found in a whole host of different games. We have some tyres lying around as loose parts which we use to play a boules-type game. Standing behind a start line, players throw or roll their tyre to try and make it finish closest to the jack or marker. The measurement aspect comes in when it’s too close to call. This can be a good opportunity to discuss standard versus non-standard units. If you’re going to wind students up by suggesting that certain players are “false measuring” to try and win, be sure to appoint a referee whose decision is final. This is a great technique to encourage accuracy, checking and rechecking measurements.


So there you have it, six ways to incorporate measurement into your outdoor space. The bottom line is that measurement can be found in almost anything you’re doing, so just be aware and don’t miss the learning opportunities! And if you do miss them, give yourself a break and catch them next time! Stay safe and stay healthy.

Lockdown Adventures: 5 Ways to Turn a Walk into an Adventure

With the NHS prescribing fresh air to boost patients’ health and wellbeing in 2019, there is no doubt that there is a strong connection between green space and good mental and physical health. As we are confined to our homes, with schools and activity clubs closed, here are five ways to take home learning outside. These activities can be adapted to any setting; from local parks to your own garden, or even your house if you are in quarantine. So, open the windows, step outside, and appreciate the natural world all around you.

Go on a Colour walk

A colour psychology chart created by UserTesting

Tune into your surroundings by looking for a specific colour on your next walk. Much research supports the notion that colour can have an affect on our emotions. Stand in a field of bright yellow sunflowers and it’s hard to feel anything but happy. Look at the turquoise blue of the ocean and calmness floods through your bones. So, choose how you want to feel each day and surround yourself with a colour that stimulates this emotion. As you are getting dressed, look for an item of clothing that matches your chosen colour then get out and go colour spotting! How many yellow/ red/ green (have fun with that one) things can you see along your walk? You could choose a different colour each and see who spots the most of their colour, or you could team up and work on embracing one emotion as a family. Reflect on how you feel at the end of the walk… does yellow really make you happy?

Go on an Emoji hunt

If you are like me, emoji’s have become part of your daily life. Whether you are happy, mad, eating cake or just think you deserve a medal today, there’s an emoji ready to depict your day. So choose some of your favourite emojis and look for them in real life, finding them in their natural environment. You can theme your walk (obviously we recommend a nature theme, like ours) to focus on a specific topic such as; buildings, transport, foods, or even emotions if you are feeling creative. 

Want to extend the fun? Take some paper and map your journey using emojis and keep it as a little memento of your adventure.

Go on a Barefoot walk

Feeling adventurous? Be daring, break the norms, and get the bath ready.  Think back to the last time you walked barefoot outside; maybe you were padding across a warm sandy beach towards the ocean, or maybe you slipped off your sandals during a picnic and felt the cool grass tickle your toes. Your poor feet spend so much of the day, jammed inside of your shoes, with a solitary job of getting your body from one place to another. But your feet are a very sensitive part of the body. Containing around 8,000 nerve endings, they are highly receptive to touch explaining why so many of us have ticklish feet. So, take off your shoes and socks and feel the fresh air between your toes. How many different textures can your feel under your feet as you move around? Move slowly, try tiptoeing or gently brushing the soles of your feet lightly across a surface. Note how the feeling changes as you move differently. Make your own barefoot scavenger hunt or use ours above. 

Follow this map

No matter how old you are or where you are in the world, you can follow this map. It is universal, transferable and pretty ambiguous by design! Choose your starting point, choose your distance, and have fun seeing where the map will take you. Once you’ve had a go at following this map, try making your own, adding rests and challenges to do along the way. Our map was adapted from ‘Surprise Yourself’ a book of fun adventures written by Lisa Curie.

Trail making

Before we had paper and mark making tools, explorers marked their paths using objects they found along their way. Release your inner caveman and make some trails for your family to follow. Look closely for materials that are available in your location, remembering to only take objects from the ground that can be put back at the end of your adventure. You can arrange stones on the ground to point which way to go next or create a big X with sticks to ensure that nobody goes off track. Add a little extra motivation by leaving a little prize at the end of your trail. 


So there you have it, five ways to turn your next walk into an adventure. Have fun getting outdoors in whichever capacity you can at the moment.

Project Inspiration: How to Make Bamboo Panpipes

Following our recent blog post on how to create wooden spinners, next up in our project inspiration series is bamboo panpipes. Opportunities for learning include safe tool use, measurement and fine motor skill development. This year, we created bamboo panpipes during our Grade 2 measurement unit. The measuring, re-measuring and sawing is a wonderfully authentic learning experience for measuring in centimetres.

Whether you’re using it as a way to practise measuring or as a challenge to play the perfect pentatonic scale, this project is great. The children also have something to take home at the end, which is a win in anybody’s book.

A Quick Note on Organisation

As with everything on this blog, you are going to take ideas and adapt them to suit your own space, number of students and confidence levels. When taking on this project, remember to consider the following:

The Layout of your Space – Consider having an area for sawing and a separate space for everything else. This will help students to manage their space bubbles while using the hacksaws.

The Process – Be clear about the process you want students to go through. For example, only approach the sawing table when your measurement has been checked and only when there is an available saw. When you’ve cut your bamboo, move back to the work station for sanding and cleaning.

Be Prepared: Giving each student a 1.2m length of bamboo to work with can be hilarious but also potentially hazardous. When concentrating on measuring, they tend to lose awareness of the other end of their stick and other people end up getting hit or poked. Pre-cut your bamboo into more workable lengths.

Step 1: The Bamboo

As a rough guide, you’re looking for bamboo with a diameter of 1.5cm. Don’t get too hung up on finding the perfect size. Just be aware that the bigger the hole in the middle is, the more air you’ll need to make a good sound.

GEEK ZONE: Bamboo is a monocot which means, like grass, it grows from the bottom up. The sections and nodes show where new growth occurred and the internal diaphragms aid the the transportation of water and nutrients. What that means for us is that wherever you see a node, the tube is blocked. If you wanted to, you could use these natural blockages to help create your panpipes. However, to assist with cleaning, tuning and ease of construction, we suggest avoiding nodes where possible.

Step 2: Measure

“Measure twice, cut once” and, “You can’t put it back on”. With these pearls of wisdom from my carpenter brother in mind, we get students to measure twice before getting a friend to check their measurement too. [Insert a short ‘measuring in centimetres’ tutorial here if necessary]. Initially, we included a ‘check measurement with adult’ step before sawing. We started at 7cm because we found that anything less than that was difficult to get a sound out of.

Top tip: Because we want our pipes to be node-free, make sure that your students know their measured distance should not cross a node.

Step 3: Cut

It’s time to get the hacksaws out. Remember to have a glove on the hand that is holding the bamboo. Try to cut as straight as possible to make your life easier later on when glueing everything together. We find bench hooks really useful to aid the sawing process but they are not essential.

If your learners have little experience with using a hacksaw, getting a straight cut might be easier said than done. If this is the case, do a quick demonstration and then give them some time to practise.

Top Tip: Keep an eye on the condition of your hacksaw blades. They can get blunt fairly quickly and sometimes bent. Bent blades can make it impossible get a straight cut and can be frustrating for students. Have a pack of spare blades and change them out as necessary.

Step 4: Name

For the sake of your own sanity, do not miss this step. BEFORE THEY DO ANYTHING ELSE, students should write their name on each freshly cut piece of bamboo. As a general rule, we encourage students to be responsible and keep tabs on their own materials. As you can imagine, this is successful to varying degrees. Names help.

Step 5: Clean and Sand

Freshly cut bamboo might be a little sharp and can contain a surprising amount of fluffy material. Sanding the ends of your pipes to give them a nice smooth finish will make your bamboo much more agreeable on the lip.

The inside of your pipes should be as clean as possible. Depending on the diameter of your hole, you might be able to use a circular file. Otherwise, grab a tent peg and start poking. This cleaning process is a vital step. Any material left inside the tube will interfere with the vibration of the air stream, which is a fancy way of saying that your tube won’t make a good sound.

Students will probably try and test the pipes once they are clean. At this stage, it’s worth having the discussion about sealing one end with a finger to create a better sound.

Step 6: Repeat

If, like us, you are using this project as an opportunity for children to hone their skill of measuring in centimetres, then you might also like to specify the lengths. We used 7cm to start with and then did 2cm intervals up to 15cm. Repeat steps 2 through 5 as many times as you need.

Step 7: Glue

To attach our pipes together, we used a hot glue gun. This is not the most environmentally friendly choice as the glue is most definitely not made from nuts and berries. It was, however, quick and fairly simple. We are looking for an alternative sticking solution.

Step 8: Plug

You are aiming to seal off the end of each pipe so that the sound resonates beautifully when you blow across the top. In the first trial versions of our panpipes, we experimented with duct tape and white tack. Both methods worked fine but looked terrible. Enter beeswax. As well as having lots of health benefits, beeswax is malleable and fairly easy to work with. We used beeswax pellets which meant that students had to smush and mould a couple together to plug each hole. We completed this project in the middle of winter and needed to use the staff room microwave to help with softening up our beeswax pellets.

If you want to be clever with your hole plugging, then it is possible to tune your pipes. The more beeswax you stuff into the tube, the smaller the space inside becomes thus creating a higher note. This is great if you have the time and can be an interesting open-ended challenge for your big thinkers!

Step 9: Decorate

How you finish your panpipes is up to you and will largely depend on the materials that you have available. At the time, we had some freshly cut willow which gave us a really nice natural finish. Some chose colourful paracord while others used batoning to split bamboo before wrapping it with sisal. The choice is yours.


So there you have it, bamboo panpipes. When it comes to playing the panpipes, it’s probably safe to say that your students won’t match your level of experience of blowing into beer bottles. So, just like the wooden spinners, encourage a little bit of experimentation and practise.

Outdoor Learning from a distance: What our eLearning looks like.

As with most of the world, our school here in Germany has closed its doors and moved over to an eLearning platform. We are communicating through a variety of online methods to ensure that home learning can be accessed by all learners in our international community. Now two weeks in, we’re starting to really notice what is working well and would like to share  some of our celebrations.

Project-based Learning

Working at home will not, and should not, be an exact replica of the finely tuned day children experience at school. There are many other authentic, real world learning experiences that the children will be having at home too. Providing project-based learning experiences allows students to work through tasks at their own pace. The open-ended nature of this kind of learning promotes differentiation by outcome, as the students are able to extend their inquiry in many directions, as their home learning environment allows.

Daily Videos

Just like at school, each morning children are greeted by our beautiful, happy faces welcoming them to another day of home learning. Creating morning video messages is a fun and personal way to connect with students, giving them a window into your daily events. So whether it’s balcony planting, wormery checking or sharing fun facts on Fridays, give your students a positive start to the day by sharing snapshots of your home learning!

Give it some beans

The German government announced school closure on a Friday and stipulated that all schools must open Monday & Tuesday to allow parents to prepare. Cue teachers scrambling to get eLearning up and going. In this time, we were able to source enough paper cups and bean seeds to send home one cup and two beans with each home learning pack. Fast forward two weeks and we have the Grade 3 students busy tracking their growth with measurement and the Grade 2 students now have a great purpose to create a structure, as part of their current unit of inquiry.

Padlet

If you haven’t used Padlet yet, it’s time to take a look. It’s an easy to use website that allows guests to share a variety of media without a login. When posts appear, it organises them like post-it notes on a pin board. It is possible to like and comment on posts and we’re finding it a great way for students to stay connected by sharing their learning. Above and below are examples of the kinds of things students have been sharing.

Happening Now

With our current guidelines still allowing people to go outside, it’s been interesting trying to strike a balance between learning experiences that can happen inside and outside. Either way, practical has been the way forward for us. In Grade 2, as part of our structures unit, students have been drawing designs, building forts and experimenting with both pyramids and post and lintel construction techniques. In Grade 3, we’ve been measuring the perimeter of objects both inside and outside. The focus for next week is going to be on getting outside. We’re providing a range of choice for students to engage with, from bug hunts and mapping to bird watching and land art.

Working with our current central idea “Living things are suited to their habitat”, Grade 1 students have become researchers. They have been inquiring into the ways their chosen mini-beast thrives in its habitat. Though painting pictures, creating dioramas and going on mini-beast hunts in their garden, students and parents have become experts on the living things in their local environment.


So there you have it. This is what we’re up to right now in these unprecedented times. Let us know how you are keeping learning going in your community. Stay safe and stay healthy.