Project Inspiration: How to Make Wooden Spinners

Spinners. Dreidels. Nature Beyblades. Call them whatever you want. They are quick and easy to make and provide a range of learning opportunities (including measurement and safe tool use to name a couple). This year, we made spinners at the end of our Grade 2 skills unit, after students had been working with tools for a number of weeks. If you haven’t introduced sheath knives and bow saws already, please do that first. Here’s how to make them:

Find some wood

The Christmas Tree Graveyard

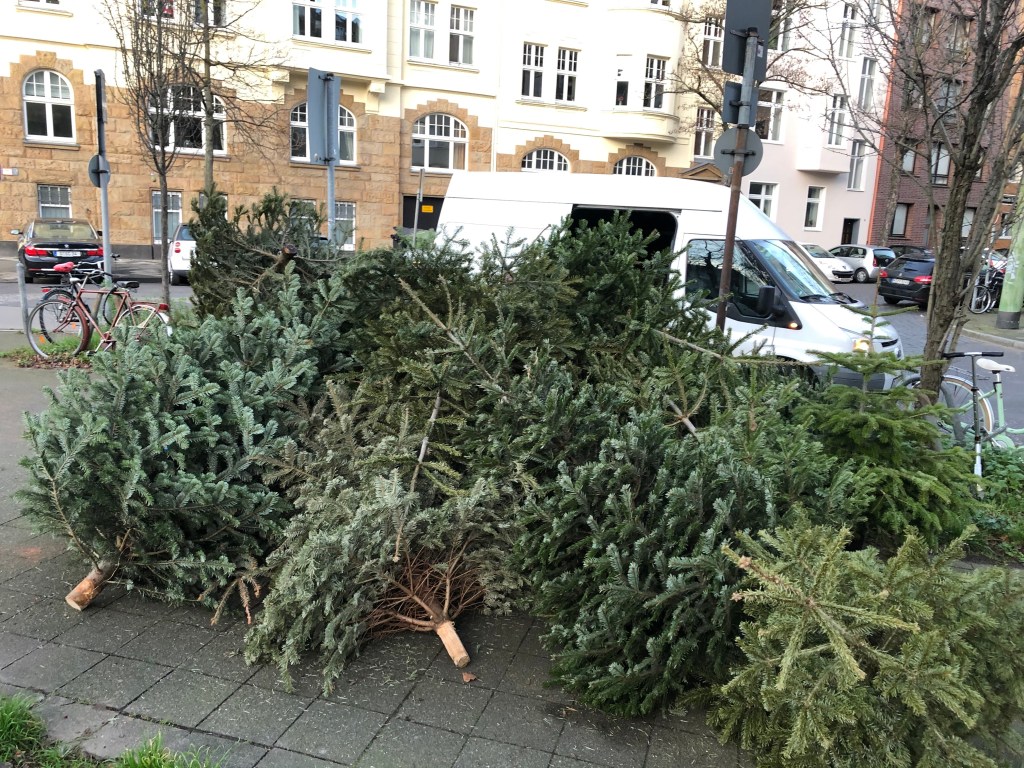
You can use anything that you can get your hands on. Hazel is great if you can find some. Be wary of harder woods like oak that are more difficult to carve. This year, we took advantage of the German Spermüll, or Christmas Tree Graveyard as we like to call it. The branches were a little sappy during the spindle carving process, but overall it worked out great.

You are going to need two bits of wood to create your spinner: one for the disc and the other for the spindle. For the disc, you’re looking for a small log with a diameter anywhere between 4cm and 7cm. The thickness of your spindle will depend on the size of drill bit that you use to make your hole. We used a 5mm bit and then worked on finding sticks that were the same thickness as our index fingers and then whittled them down.

Top Tip: Fresh sticks are easier to carve and are great for ensuring carving success. You’ll get a nice tight fit on the day, but remember to discuss what might happen when the wood dries out.

Cut the Disc

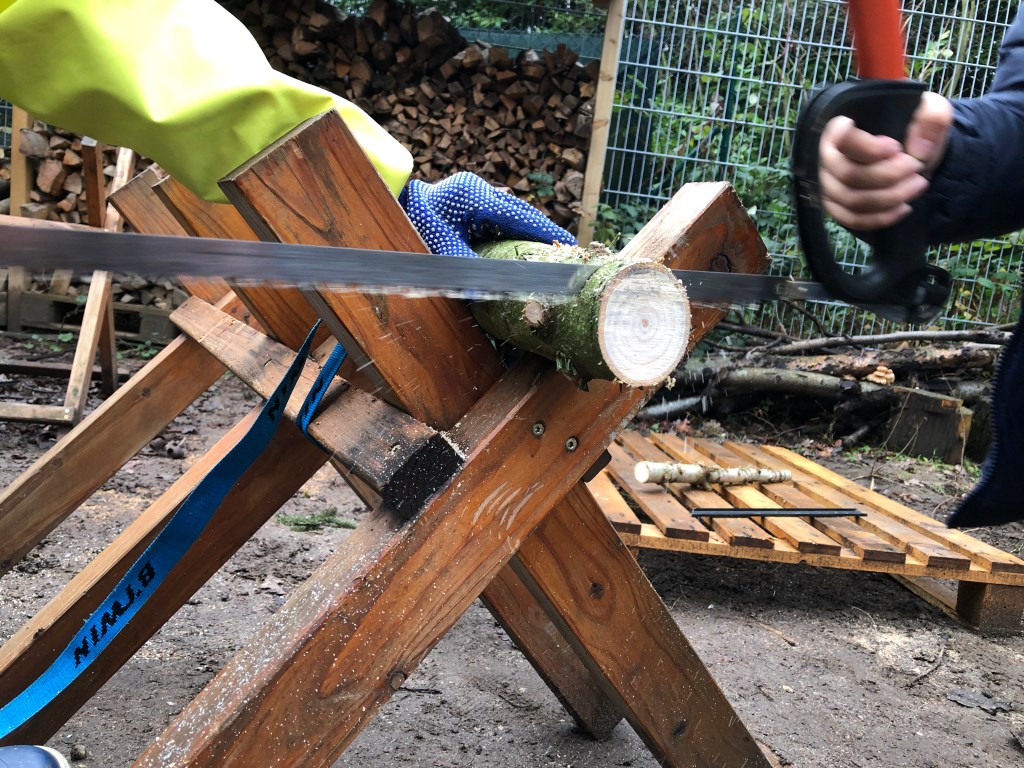
It’s time to get the bow saw out. Measure 2cm from the end of your thick log and make a mark. Try to cut as straight as possible as this will ensure your disc is even and not heavier on one side than the other. The photo above shows the good, the bad and the ugly when it comes to disc cutting.

If your learners have little experience with using a bow saw, getting a straight cut might be easier said than done. If this is the case, put yourself in a position to assist or give them some time to practise.

Drill the hole

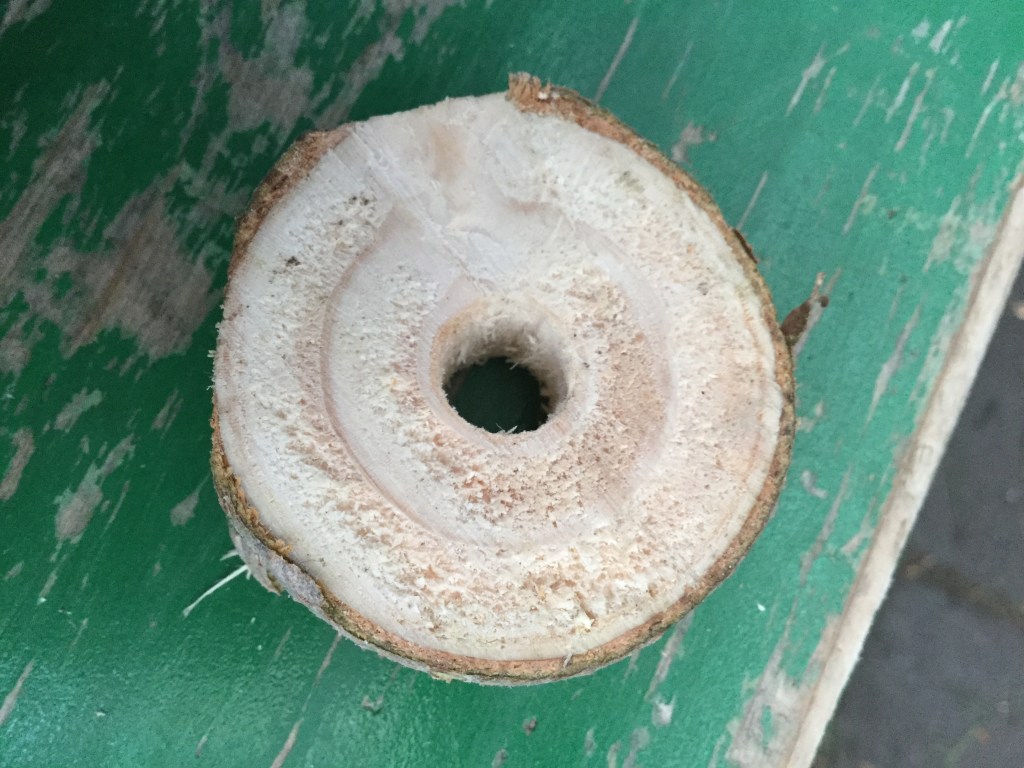
This step is important. Getting your hole in the centre will make your life a whole lot easier later on. If you’re short on time, you can use an electric drill, which will require supervision. Otherwise, crack out the hand drills and make sure that your students don’t try and drill through their disc with their hand on the back of it.

We used a 5mm drill bit, but you can play around with different sizes that you have. A round file can be useful for making small holes bigger.

Measure and cut your spindle

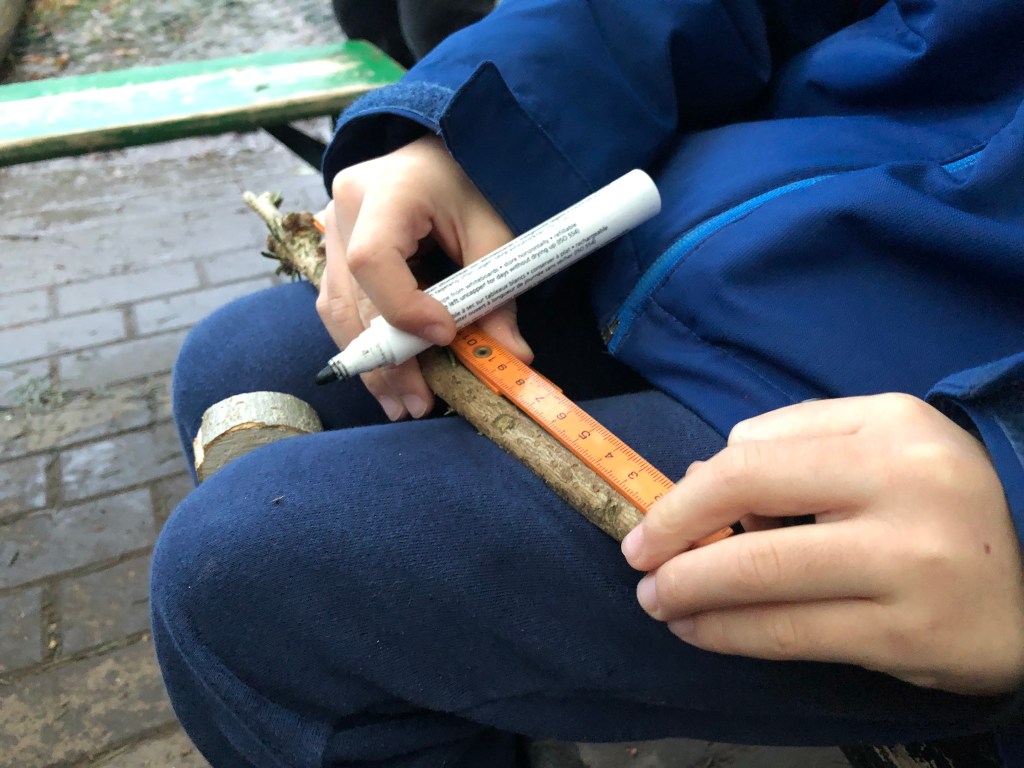
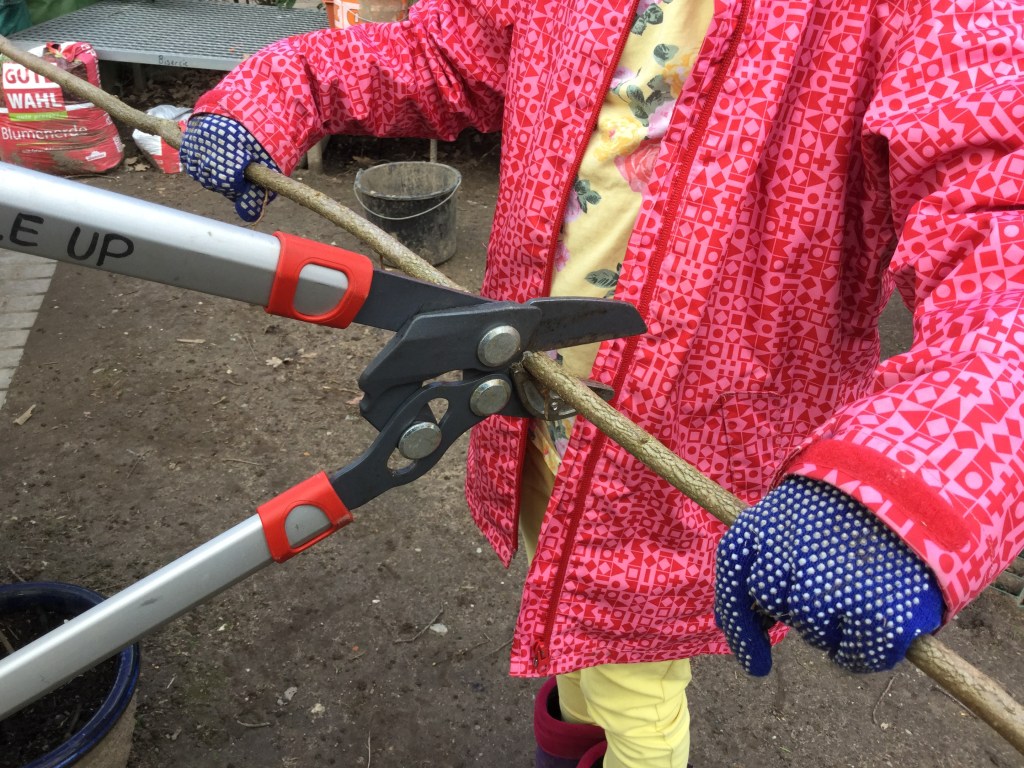
You’re aiming to find a stick that is ever so slightly too big for the hole. Measure and mark 7cm. Measure twice, cut once. You might have the grip strength to cut the stick with a regular set of garden clippers. Learners who have eaten less broccoli than you may require the added leverage that comes from using a pair of loppers.

Loppers crash course: using loppers involves two people. One person is the boss and the other does as they’re told. The person holding the loppers is the boss. The other person holds the stick in front of them like a set of handlebars from a bike. The boss then moves the loppers into position and makes the cut. Accuracy becomes difficult if both people move the thing that they’re holding.

Shape your spindle to fit
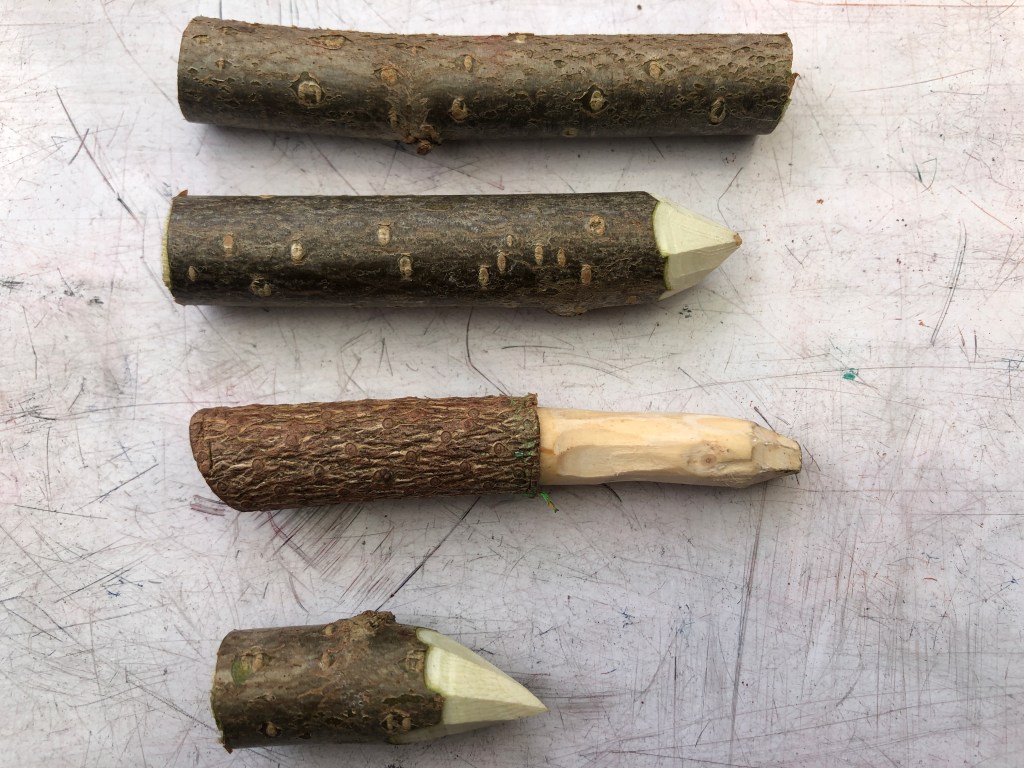
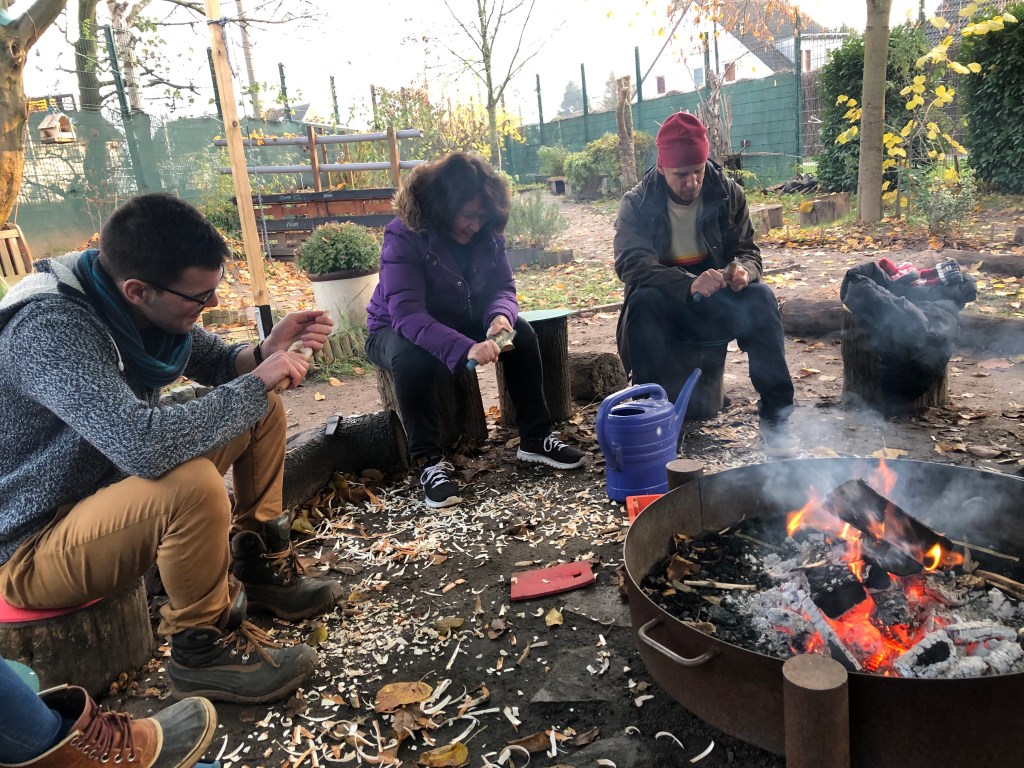
It’s time to grab a sheath knife. First, you want to make the end of your stick look like a pencil. Once you’ve done that, test that it fits easily into your hole. The next part is the tricky bit. You want to try and remove material from the shaft of the spindle without taking any more off the point. Some students struggle with this and their spindle gets shorter and shorter. It might take a couple of spindles to get the hang of this technique. Insert persistence pep-talk here.

You can always take more material off, but you can’t put it back on. With this in mind, keep testing the spindle in the hole until you get a nice tight fir.

Decoration optional, then get spinning!

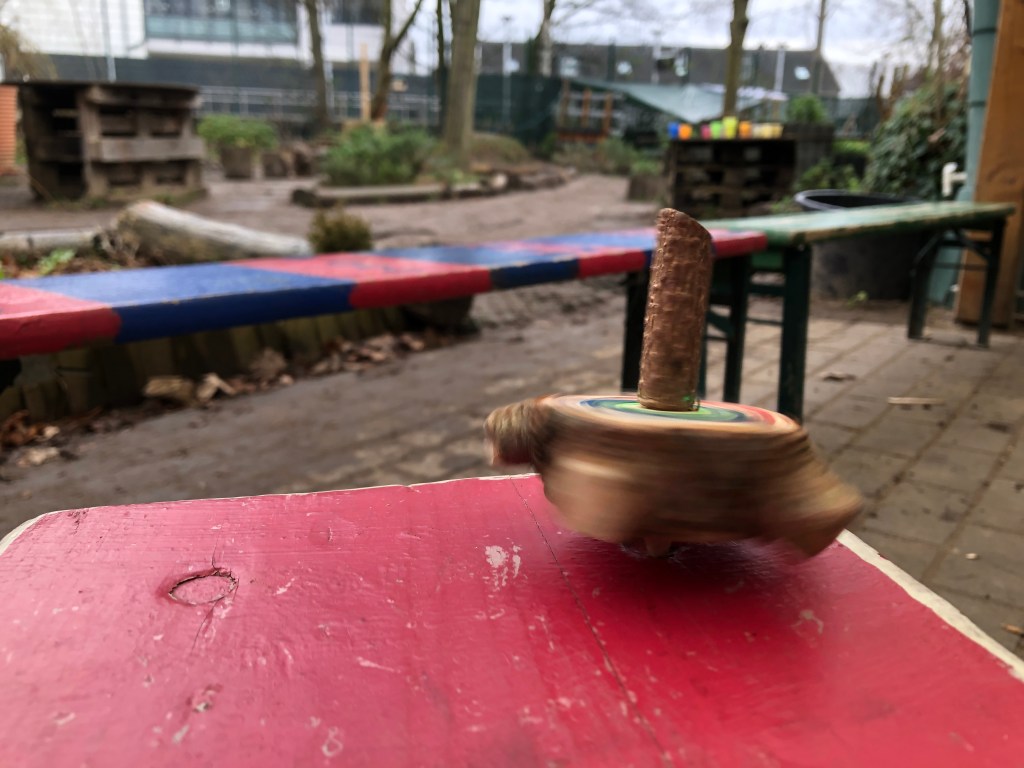
Initially, some students might struggle with the fine motor control to get a good spin going and as a result will tell you that their spinner doesn’t work. You might have to demo that it does work and suggest that they need to work on their technique.

We use a fire bowl as our Nature Beyblade Arena. The only rule is that you must shout “Let It Rip” when spinning your top. The last spinner standing is the winner.


So there you have it, the first in a series of projects that will hopefully inspire you to get your make on. Adapt this project as you wish and stay safe.

10 Things to Look Forward to as an Outdoor Learning Teacher in 2020

Happy New Year! To kick off 2020, here are 10 things that you have to look forward to as an educator utilising your outdoor space to make learning authentic and awesome. Well done you.

1) More frequent ‘Outdoor Learning International’ Inspiration

2020 is our year for being more proactive with posting on our blog, so hold on to your hats. In the near future, be ready for mud kitchen inspiration, ideas for developing space using wooden pallets and taking maths outside with a focus on measurement. Our hope is to develop a community of sharing Outdoor Learning ideas and expertise. Feel feel to take inspiration and use any ideas that spark your fancy, and let us know what you think. If you’re into that, click the “Yes Please” button on the right to receive updates.

2) Same clothing, different day

Steve Jobs wore the same clothes every day. Barack Obama only wears blue or grey suits. Decision fatigue is a thing, and it suggests that you tire from making multiple decisions throughout your day. People like Obama and Jobs limited their clothing choices in order to minimise their decision making so they could make better decisions later, be those in the worlds of technology or politics.

My current clothing of choice are my Fjallraven Keb trousers and my Montane Extreme Smock. I look exactly the same, everyday. This is not because I am an avid Jobs and Obama fan, nor is decision fatigue avoidance high on my list of priorities. I’ve found what works for me and I’m sticking with it. As the old saying goes: there’s no such thing as bad weather, only inappropriate clothing. Find what works for you and stick with it.

3) Skip diving on the weekends

Did I say weekends? This is not really confined to weekends. Any time that you walk past a skip, you’ll be looking in it. We were recently doing the German Christmas Market tour with family and came home with three large wooden bobbins that had been skipped at our local building site. Cheers.

Didn’t we have a lovely time, the day went to market.

4) Pity vs Jealousy

When you’re walking along the corridor in the depths of winter looking like a puffed up onion in all of your layers, you are bound to get looks of pity and maybe even a, “Ooh, I don’t envy you in your job today”.

On the other hand, roll on the summer time when it’s 25+ degrees and you are sauntering along in shorts and T-shirt. Those looks of pity turn to scoffs of jealousy and you get things like, “Is your job really a job?”

Meet Claire. Claire works in 3rd Grade. Claire is one of the best people at the pity vs jealousy conundrum. She’s great.

Possible responses include:

  • “Speak to me in 6 months”
  • “It sucks to be you”
  • “Here’s some research about how my blood pressure and immune system are better than yours”

5) Goodbye manicure, hello grubby calluses

When you’re working hard to facilitate epic hands-on learning experiences for your young people, you are not going to be able to avoid getting those hands dirty. The good news is that research suggests getting your hands dirty is good for you and it might even be an antidepressant. Win.

Take care of those hands and remember to wash them. A spot of hand cream also wouldn’t go amiss.

Top Tip: a pinch of sugar with a spot of soap will get out some of the more ingrained dirt. Like a homemade Swarfega, that stuff your Dad had under the sink growing up.

6) Things in pockets

As an indoor teacher, I would usually arrive home with at least one whiteboard pen in my pocket. As an outdoor teacher, I still have the occasional pen but my pocket booty is so much more wonderfully varied. Acorn hats, bits of wood, bits of tree, a Pokemon card… the list goes on.

All in a day’s pocket…

Top Tip: Empty your pockets before going home, or prepare your partner for a magical variety of gifts on the kitchen side.

7) The Smell of Fire

Using fire lighting as a learning experience is second to none. Smelling of fire afterwards is not so great. Some people will tell you how they love the smell of fire and how it brings memories rushing back of when they… blah blah blah. How wonderful for them. Smelling of fire everyday because you’re halfway through your skills unit can be a bit tedious. Nobody has ever complained at me on the tram home, but it might happen one day.

Smelly people have no friends

Top Tip: get hold of some Febreze. Febreze is your friend.

8) “But I won’t be cold…”

This is the response you get when you tell a student who has just come inside from recess on a cold day to get their jacket for outdoor learning. Generally, you can go one of three ways:

  1. “This is not a discussion. You’re not coming out without a jacket” – This may sound a little harsh but when your outdoor time is limited, this conversation with seven different students only makes it shorter.
  2. “OK, your choice” – You know that you’re right, but our actions and choices have consequence and what better way to learn that than through the medium of shivering?
  3. “Bring your jacket and hang it up when we get there, then it’s there if you need it” – The compromise. Invariably, the jacket will get worn before you even get halfway through the lesson and you can quietly bask in the glory of being right.

9) Becoming a chainsaw meerkat

Picture the scene: You’re walking back inside after a long lesson out in the cold, looking forward to that well-earned cup of tea and then you hear it. You pause. Could it be? It’s definitely there, but where is it coming from? That guttural yet beautifully sweet song that is the sound of a chainsaw.

Hello my friend…

Whether you’re making your circle of logs for the first time or topping up your firewood for next year, nothing beats free wood. When approaching a tree surgeon, be sure to do so safely. Find out who the boss is and ask nicely if you can take some. Very often, you’re saving them some time by taking away some wood. Depending on how nice they are, you might be able to specify the shapes and sizes that you want. You also might need to just take what they give you and cut it up yourself.

Top tip: have a couple of bottles of beer lying around to graciously thank any chainsaw master that lets you take some offcuts. If you don’t have any tree surgeon friends, make some.

10) According to the research, you’re going to feel great!

In a world where Forest Bathing is becoming a thing and doctors in Scotland are prescribing ‘nature’ to help with a patient’s treatment, you are in a wonderful position to be able to take learning outside as part of your job. Good for physical health and mental health, the research is out there.


Happy 2020

from

Outdoor Learning International!

A Beginners Guide to Art in Nature

Art in Nature. Land Art. Transient Art. Call it whatever you like. Taking learning outdoors using art as your vehicle can be an awesome place to start. The following pretty much makes up a unit of inquiry that happens with our Grade 2 students at the beginning of the school year. Comment below with other ideas you have, let’s get this sharing started!

1) Rainbow chips

A lovely way to get started is to use a Joseph Cornell activity called Rainbow Chips. This is basically a colour hunt where students are provided with coloured objects and their goal is to explore the space to try and locate that colour. When they find it they find it, switch for another colour and so on and so forth. Some people use colourful bits of broken pottery for this, colourful gems also work. Our favourite is to nip down the the local DIY shop and liberate a whole load of paint colour samples (ninja skills/confidence required). Up to you, whatever you can find.

Liberated paint sample cards

2) Start the conversations

Colour is an element of art. When we look at a piece of art, colour is something that we can comment on. At this point, we might whip out a classic Goldsworthy print and try to identify some colours. Enter stage right, the other elements of art. Value, texture, shape, line, form, space, & perspective. The opportunities for developing language and vocabulary here are boundless. Introduce in whichever way suits your style but be sure allow time for students to explore the outdoor space to find examples of each thing. At this point, our students are collecting what they find using Book Creator.

Using Book Creator to collect examples of space

At the end, bring back your Goldsworthy (or other) and see if students can comment on and give their opinion, linking in to their shiny new ‘Elements of Art’ vocabulary.

3) Get inspired

Start talking about transient art in any school and you’ll get… “Land Art? Have you looked into Andy Goldsworthy?” And of course, being the grandfather of the scene, his stuff is the bomb. He’s got plenty of books out there but there is also a range of things on Youtube, like this and this, that are good for inspiration. Andy is great, but please don’t stop there! Marc Pouyet’s books (especially this one) are also an excellent source of imagination kickstarters. Even a quick search for #landart on Twitter will open up a whole load of other folk who are doing some pretty cool stuff too. People like @RFjamesUK, @escher303, @TimPughArtist and @LandArtforKids are a selection of our favourites.

4) Create

Give it a go. Crack on. Go outside and create. Depending on resources that you have available, you might want to restrict the amount of materials, or not. We advocate the old “No Pick, No Lick” as a general rule in our Outdoor Learning space. Not because we don’t like fun. Because we find that if every 2nd grader decides that they want to use those leaves from that bush, then we end up with pretty naked shrubbery.

While creating, encourage students to make conscious choices as artists. Why have they chosen that location? Have they notice the texture of the rocks that they’re using? What can they tell you about the value in the acorns that they’re arranging in that circle?

Creating can occur multiple times, of course. To mix it up a little we’ve found it interesting to challenge our artists to use only one type of object. For example, only conkers or only oak leaves.

The abstract discussion is an excellent way to add depth to an Art in Nature session. Does our artwork need to be something? Can we leave it open to interpretation? Do we find the abstract discussion is accessible to all 2nd graders? Absolutely not. Sometimes, your artwork just needs to be a house with a pool. Sometimes, you just need to sit in a patch of sun a lick a rock.

5) Focus on one thing

If you have students that are not sure where to start, encourage them to focus on one element of art in particular. Shape, perhaps. Our old friend Andy G loves a good circle. Why not try some different shapes? Shapes within shapes? Lots of the same shape? Regular shapes? Irregular shapes? Is an oak leaf a shape? Shapes.

6) Gravity Glue

Michael Grab, or Gravity Glue as he’s better know, is a wonderful way to segue into something a little different. Check out the video below. Rock balancing can result in a calm and relaxing flow state, enhanced by deep concentration (closely followed by infuriation as the whole thing falls on your toe). Fun fact: rock balancing championships are a thing.

Gravity Glue

Alternatively, find out what an Inuksuk is, and give one of those a go!

7) Go for a walk

Inspiration can come from anywhere and anything. We like to head off down to our local section of the Rhine. In the past, inspiration has come from cool things that we’ve seen en route and also the beautiful location when we get there. If nothing else, we find that a change in location offers copious amounts of new materials and more space than our regular Outdoor Learning locale. Where could you go?

Our local stretch of the Rhine River. It looks worse in the rain.

8) Get inspired… again…

Are musicians artists? So, if we bash together a rock and a stick, are we creating art? Experiment with different ways of playing objects that you can find in your outdoor space. How many different ways can you play your log? Try making a thunderstorm. Everybody grabs their favourite noise maker, one person conducts and sets the dynamics.

Music from Nature – Diego Stocco

If you’re lucky enough to have access to devices which support GarageBand (a wonderful tech-integration team helps too), then have a go at creating some Diego Stocco inspired compositions. This is cool stuff, make no mistake. It’s also pretty difficult to get the end result sounding anything like Diego, but the process can be awesome.

9) Don’t forget to look up

Who doesn’t fancy spending time laid out on the grass looking up at the white fluffy things? This is great for our line of inquiry which considers people responding differently to same stimuli. Not possible everyday so you have to pick your day. An easy way in is this book. Get outside and lie on the ground.

10) Share

Whether you host an exhibition for family and friends, post photos on Twitter and Instagram or just leave your artwork for the random public out walking their dogs; sharing your work is a must. Get students to prepare a blurb for their creations, linking back to elements of art and their inspirations. In our parent exhibition, students stand by their piece and explain their choices as artists, but these could be written also. If you’re posting on social media, remember to connect with the people that inspired you!

PYP Blurb